
In today’s world of technology, we want easy, fast, and same codebase development. Everything is possible with huge advantages in top Framework like react native. Learn once, write anywhere – React-Native, it combines the best parts of mobile (Android and iOS) and web development with React, a best-in-class JavaScript library for building user-interfaces.
React Native is similar to React JS, but its building blocks are react native components rather than web components. For example, React Native makes use of specific UI APIs like View and Text, but React makes use of important HTML5 building blocks like div and span to create its layout.
Hence, in order to comprehend the basic structure of a React Native project, you need to be familiar with some of the essential React principles, like JSX, components, state, and props.
How to Get Started
For Mobile App: –
Before creating a React Native application, you should have the Node, JDK and Android Studio (For Mac Watchman, XCode and Cocoa Pods) installed in your system.
1) Create one folder and open that path in terminal and enter below command.
npx react-native init AwesomeProject
2) If you want to create App on specific version or specific templates, you can use those commands.
npx react-native init AwesomeProject –version X.XX.X
npx react-native init AwesomeTSProject –template react-native-template-typescript
3) Preparing the device: –
a) If you have Mac OS then open your simulator of any iOS version and enter below command in project path terminal.
(npx react-native start) – Start metro server and then
(npx react-native run-iOS)
For more info on Mac, Refer this link (https://reactnative.dev/docs/environment-setup)
b) If you have windows or Linux just open your project in Android Studio and click on icon placed on top toolbar to create Virtual Device.

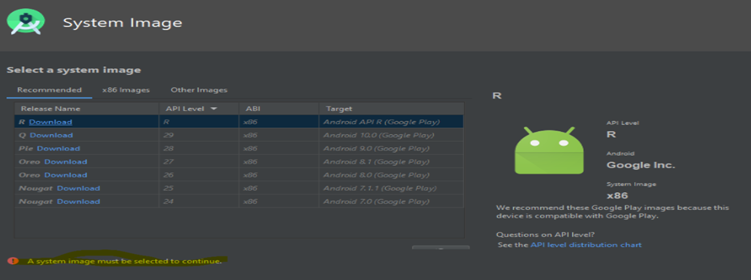
c) After that you get one screen to download system image.
Download version and click on Create-Virtual Device.
d) After creating AVD then click on green triangle button to run virtual device.

e) Once your Device is ready, open your project on any editor and enter below command on project path terminal.
(npx react-native start) – Start metro server and then
(npx react-native run-android)

4) You Can create React-Native App through Expo CLI as well.
a) Install Expo Cli through this Command.
npm install -g expo-cli
b) Create App using Expo.
expo init AwesomeProject
c) Go to your project path terminal and run npm start.
d) This command will generate one QR code in your terminal.
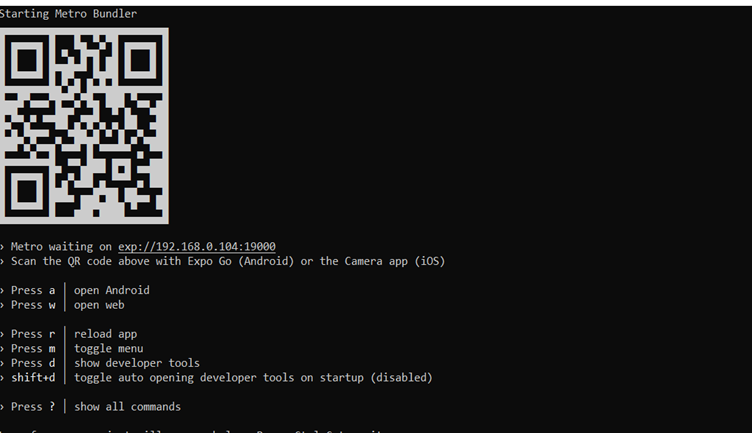
e) After that install Expo client app on your device and scan that terminal QR code through this App and you will get that on your device.
For Web App: –
1) Create one App first.
npx create-react-app my-app
2) Install below plugin in project path terminal for react-native WebApp.
npm install react react-dom react-native-web
3) After that go to the src folder in code structure and open index .js file
4) Add below line to imports.
import { AppRegistry } from ‘react-native’
5) Comment all ReactDOM.render method and add following code.
AppRegistry.registerComponent(‘App’ , () => App);
AppRegistry.runApplication(‘App’ , {
rootTag: document.getElementById(‘root’)
});
6) Now go to the App.js page and comment all html code and add following code.
import { View , Text } from ‘react-native’; (This command will import the default UI Syntax like block level and inline elements)
<View>
<Text> Hello World </Text>
</View>
7) You can add styling in same js page in react-native.
import { View , Text , StyleSheet } from ‘react-native’; (The StyleSheet is used for applying CSS in React-Native)
<View style={styles.bgcolor}>
<Text> Hello World </Text>
</View>
add below code after App method.
const styles = StyleSheet.create({
bgcolor: {
backgroundColor: ‘#91E9EC’,
},
});
8) Run your App using npm start and it will open new tab on 3000 port.
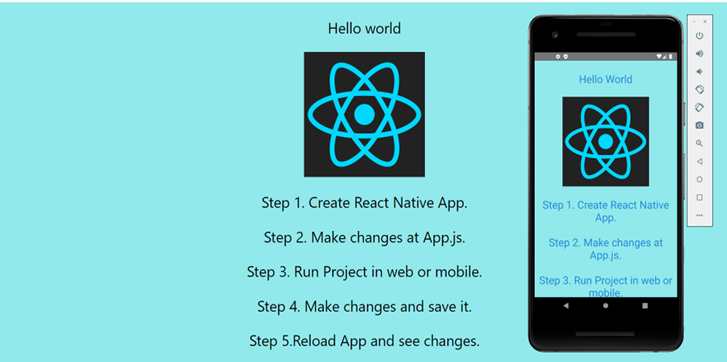
That’s the final view of Web and Mobile View of your App.
Creating Your Own Application is Simple
Congrats! You can create your own React native web and mobile app with above steps and use this to create more projects. This is only a starter to help familiarize you with React-native concepts and a lot can be improved over moving to actual production. I hope you are excited to learn more ways of doing things with React-native.
“Wow! I really appreciate that. You have shared informative content!”
Very Informative..
that’s awesome !!