
Data management in Salesforce deals with importing or exporting data/records in the Salesforce organization. There are many tools available to import the data into Salesforce org.
The four most common tools are:
- Data Import Wizard is a tool available within the Salesforce org Setup.
- Data Loader is an external tool provided by Salesforce that easily connects to your organization(Salesforce org).
- Dataloader.io is an online method to import and export data in Salesforce.
- Salesforce Inspector is an extension to access the object user’s information directly.
1. Data Import Wizard
The data Import wizard easily imports data for many standard Salesforce objects, including accounts, contacts, leads, etc., and data in custom objects. there is a limitation we can import data up to 50,000 records at a time.
Step 1: Start the Data Import Wizard.
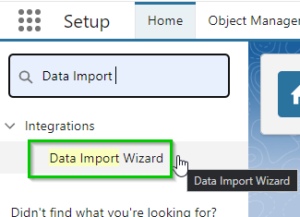
- In Setup, enter Data Import Wizard in the Quick Find box, and click on the Data Import Wizard.
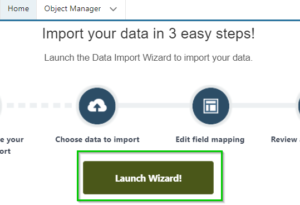
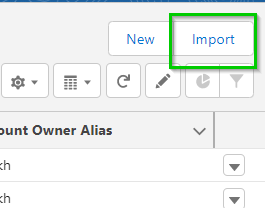
- Scroll down and Click on Launch Wizard Button. We can also launch the Data Import Wizard directly from the Tools list on that specific object’s home page. You just must click on App launcher, select the specific object you want to import the data into, and click on the import button on the right side of the home page.
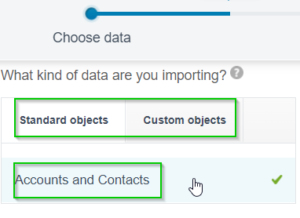
Step 2: Choose the Data That You Want to Import.
- To import accounts, contacts, leads, solutions, opportunities, or articles, click on Standard Objects. And for custom object data import, click Custom Objects.
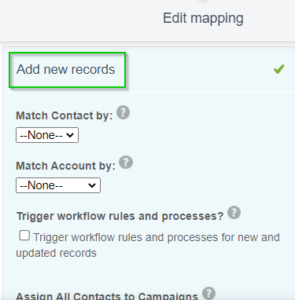
- Identify whether you want to update existing records, create new records to Salesforce, or create and update records both simultaneously (upsert the data).
- Select and click the checkboxes for specific Options for criteria as essential. Place the cursor over the question marks of each option for more information.
- Drag and drop the file that contains your data into the upload area of the page, or directly choose the CSV file from your system.
- Select a character encoding method for your file.
- Select a comma or tab as a value separator.
- Click Next.

Step 3: Map your Data Fields to the Salesforce Org Data Fields.
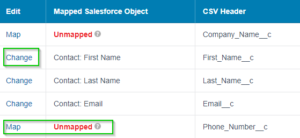
NOTE: In Salesforce, the Data Import wizard automatically mapped as many of your data fields as possible to standard Salesforce data fields. But if the data import wizard cannot map some of your fields, you must do mapping manually. Unmapped fields are not able to import into Salesforce org.
-
- Check the list of mapped data fields and locate the unmapped fields.
- Click Map to the left of each unmapped field.
- In the Map Your Field box, search and select up to 10 Salesforce fields to map.
- If you want to change the mapping, anytime you can change it. You can delete fields you don’t want to map, then click Map.
- Click Next.
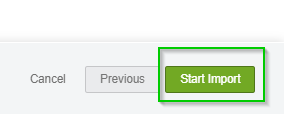
- Review your imported data information on the Review page.
- Click on Start Import
2. Data Loader

It is a client application used for the bulk import or export the data. we can insert, update, delete, and export large amounts of data within the salesforce org. there is no limitation in the data loader; we can load up to 50,000 to five million records.
If you load more than 5 million records, you must work with a Salesforce partner or App Exchange for a suitable partner product.
Step 1: Install and Setup Data Loader
- Installation of Data Loader according to your operating system and hardware requirements.
- Select settings and edit the fields as needed.
- After Installation and setup, you need to log in to the Salesforce org that you’re importing or exporting the data.
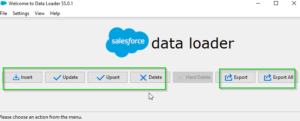
- Open the data loader from your download location and click any button; it will open a popup for logging into the org.
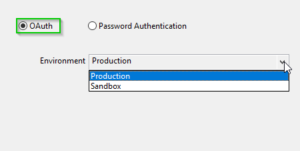
- The first option is OAuth, and Choose Environment (Production, Sandbox), then click login.
- Enter your Username and password of your org.
- To Allow Access, click on Allow button.
- In Data Loader, Login successful will be shown.
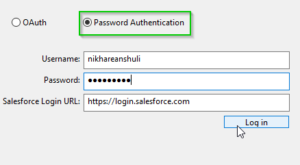
- The second option is Password Authentication. You have to enter your username and password directly into it, and you will log in to salesforce org.
Step 2: Insert, Update, or Upsert your Data in Salesforce Org
- Click the Insert Update Upsert Button according to your requirements
- Choose the specific Object you want to insert, update, or upsert the data in it.
- Select your CSV file.
- Click Next
- Match the salesforce fields to your columns. you can auto-match fields to columns and clear mapping as needed
- you can Save Mapping for the future and click Ok
- Click Finish
- Review Results
3. Dataloader.io
Dataloader.io is powered by Mulesoft. It is an online way to import or export data in salesforce org.
The Dataloader.io free edition allows up to 10,000 records per month and file size limits of 10 MB.
you can use dataloader.io to insert, update, delete, export, or upsert Salesforce data/records for both standard and custom objects in a few easy and simple steps.
Step 1: Start the Dataloader.io
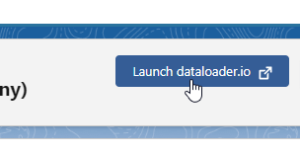
- In Setup, enter Dataloader.io in the Quick Find box, and click on the Dataloader.io
- Click on Launch dataloader.io.
- Click the Confirm button.
- Click login with Salesforce Credentials or login into production or sandbox
Step 2: Select the object and import/export your data
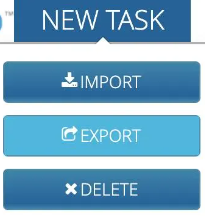
- Click NEW TASK and select EXPORT.
- Choose the specific object from the Object list.
- Click Next
- Click Upload CSV.
- Select the Records/Data file from your desktop, and click Open.
- Ensure your data is mapping correctly to the existing data.
- Click Next.
- Click Save & Run.
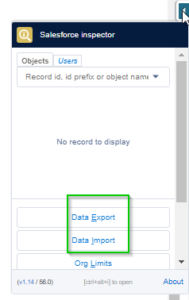
4. Salesforce Inspector
Salesforce Inspector is an extension for Chrome and Firefox. It is a tool that helps to quickly view objects, user information, field details, and import and export operations from the record detail page in Salesforce. It is an even faster and easier way to import and export bulk data into Salesforce.org.
How to use Data Import Feature in Salesforce Inspector:
- Click on Data Import/Export Option.
- Select the type of Action (Insert, Update, Upsert, and delete).
- Select the specific object name.
- Choose your data file format as an excel sheet or CSV file or simply copy and paste the data from a file in the data column.
- Click on the Import button and see the status.
Reference Links
Conclusion
All four methods mentioned above help you to manage your data in salesforce org. these data management tools of salesforce help you manage information about your company. this blog helps you to learn about four different alternative ways to import or export or update the data/records into the salesforce organization.
Keep Learning!