
For those unfamiliar with OneStream’s reporting capabilities, the two most often used ways to view data in a user-friendly manner are Cube Views and Dashboards. This will be a three-part series that shows how you can create a simple Cube View, Dashboard and how to make them dynamic.
Part 1 – How to Build a Simple Cube View Report
Part 2 – How to Build a Simple Dashboard
Part 3 – How to Make Your Cube View and Dashboard Dynamic with Parameters
In Part 3 we’ll go over how to maximize the reporting capabilities of your Cube Views and Dashboards by adding dynamic parameters. We’ll discuss how to create them and how they look different in Cube Views and Dashboards.
A basic understanding of Cube Views and Dashboards will be required for this build.
We’re going to focus on creating a parameter to allow our users to choose the entity they want to see in our report. Start by going to your Dashboard page and opening the Product Maintenance Unit we built in the last blog post. Under components we will create a CPX_Entity_Select parameter and set it to the settings in the screenshot below.
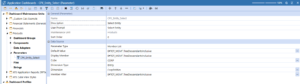
Note the naming convention used for this parameter. We use .TreeDescendantsInclusive here so that we can see the options displayed according to their hierarchy (from top to bottom).
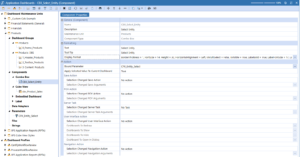
Starting with the Cube View, the only modification we need to make is the following change in the column Member Filter. We will replace E#TOT_MGMT with E#|!CPX_Entity_Select!|, leaving .DescendantsInclusive within the member filter.
Here, we’re calling the parameter we created. Since it’s meant to dynamically add the entity for us depending on our choice, we will replace the hard coded TOT_MGMT with the pipe function, |!CPX_Entity_Select!|. The pipe lets OneStream know that CPX_Entity_Select is not an Entity to look up, rather it’s a function, a piece of code to run.


Modern Accounting: How to Overcome Financial Close Challenges
Improvements in each of the following period-close core tasks can provide transformative change and are reviewed in this guide include closing the books and external reporting, periodic reconciliations, and managing the period-close process.
A dialog box should appear when you run the Cube View, choose any Entity and run the report. With this we’ve completed the edit we needed to do to make our Cube View dynamic.

For the Dashboard, we will follow a similar process as when we created the individual components, dashboards and added them to the 0_Frame.
Since we already created the parameter, we will focus on creating a Combo Box which allows us to choose the parameter in the Dashboard when we run it. Combo Boxes are always shown unlike the select parameter dialog box in the Cube View.
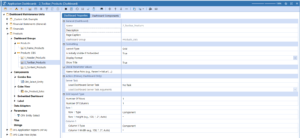
Name the Combo Box CBX_Entity_Select. Note the small difference in the name compared to the parameter we built.
The formatting used for the Combo Box is: BorderThickness = 1, FontSize = 14, Height = 30, HorizontalAlignment = Left, IsMultiSelect = False, IsVisible = True, LabelBold = True, LabelFontSize = 17, LabelPosition = Left, MarginBottom = 10, MarginLeft = 15, MarginRight = 15, MarginTop = 10, VerticalAlignment = Center, Width = 375
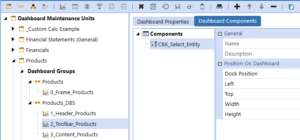
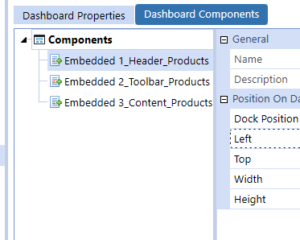
Create a new Dashboard under Products_DBS and name it 2_Toolbar_Products and add the CBX_Entity_Select component to it.
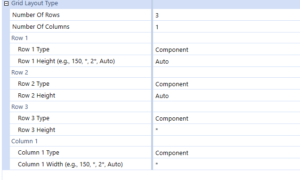
Change the 0_Frame settings to what is shown below.
Add the 2_Toolbar_Products Dashboard to the 0_Frame as a component and click save.
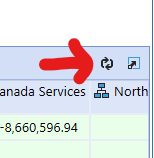
You should see the following result when you run the Dashboard. In the toolbar, you can change the value of the parameter to whatever you want to choose. But you will need to hit the refresh button on the Cube View to view the changed results.

In this 3-part series, we have developed a simple Cube View and Dashboard. We have also added dynamic functionality to our reports by incorporating Parameters which allow for quick and easy changes to our desired POV or Member Filter.
Very useful blog. I shared it in my team. Thank you for writing!