
A collection of nodes or machines operating jointly is known as an OpenShift Cluster. A Master and a Worker node are the two types of servers that make up Kubernetes’ top level. These servers may be physical servers or virtual machines (VMs) (Bare metal). These servers work together to form an OpenShift cluster, which is managed by the Control Plane services.
In this article, we discussed how to build up a multi-node Openshift (OCP) cluster using user-provisioned infrastructure on AWS.
OpenShift Cluster can be Installed in 3 Different Ways:
1. Community Edition, often known as OKD (Origin Kubernetes Distribution)
The open-source upstream community edition of Red Hat’s OpenShift container platform is referred to as an OKD. Based on Docker and Kubernetes, OKD is a platform for managing and orchestrating containers.
2. Red Hat OpenShift Service on AWS (ROSA)
Red Hat and Amazon Web Services jointly administer and provide support for Red Hat OpenShift Service on AWS (ROSA), a fully-managed OpenShift service (AWS). You are free to concentrate on deploying apps because your clusters are being maintained by this service.
3. Enterprise Edition, aka Openshift Container Platform (OCP)
What is OCP in OpenShift?
A reliable hybrid cloud foundation for developing and growing containerized applications is known as Enterprise Edition, also known as Openshift Container Platform (OCP). Profit from faster platform upgrades and installation from a leader in enterprise Kubernetes.
What is User Provisioned Infrastructure (UPI)?
Since Red Hat OpenShift 4 was released, the term “User Provisioned Infrastructure” (UPI) has been used to describe environments where users deploy the infrastructure (compute, network, and storage resources) that houses the OpenShift Container Platform. In this kind of installation, the installer will install the Openshift Cluster and resources linked to Openshift while you, the user, deploy underlying infrastructures like the operating system.
This article will discuss a subject in Openshift called How to Install and Configure Multi-Node Openshift (OCP) Cluster Using Run It Yourself User Provisioned Infrastructure. You must complete a collection of 30+ Hands-on Labs from us in order to understand Openshift and pass the EX180 & EX280 examinations.
This blog will discuss:
- CONFIGURE AND INSTALL AWS CLI ON LINUX (EC2)
- Create an Openshift cluster using user-provided hardware
- Cluster installation during open shift
- Accessing the Cluster
- Examine Cluster Logs
- Eliminate the Openshift Cluster.
Conditions For Cluster Configuration:
An alternative to the difficult and painful process of deploying Openshift clusters is to use a cloud platform. Any cloud platform can be used; in this case, we’re utilizing AWS Cloud. Make sure you have the following configuration available before you start constructing a cluster:
- We will follow the guide here to Install & Configure Multi-Node Openshift Cluster using Run It Yourself User Provisioned Infrastructure On AWS.
- Create a free AWS account because we’ll build up an Openshift Cluster on the AWS Cloud.
- Create and update a Redhat account, join Redhat Developer, and access the Active subscription. We require you to go to the subscription page, where you should see one Active Subscription.
- Using the free domain name registration service offered by Freenom.com. For connecting with Amazon Route53, we will use this domain name for a number of labs throughout the entire course.
- Sign up for nameserver entries to configure Amazon Route53. Visit our article on Introduction to AWS Route 53 to learn how to configure Route53.
- Using EC2, starting a Linux instance.
The AWS EC2 instance used for this setup has the following configurations.
- AMI: select 64-bit (x86) architecture.
- Instance type: t2.micro
7. Utilize Putty to connect to an EC2 instance.
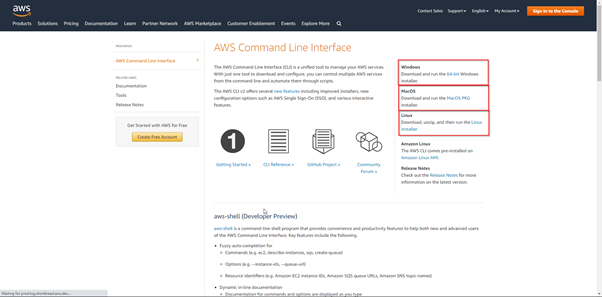
Configure and Install AWS CLI on Linux (EC2)
The AWS CLI is one of the available AWS tools (Command-line interface). Through commands, it is used to manage AWS services. An integrated configuration for managing AWS public cloud services is called the AWS Command Line Interface (CLI). Using a single tool, we can automate the download, configuration, and monitoring of numerous AWS services using scripts.
 Create an Openshift Cluster Using User-provided Hardware
- Making A Key Pair For SSH Access On A Cluster Node:
Create key pair:
$ sudo -i
$ ssh-keygen -t ed25519 -N ” -f ~/.ssh/id_rsa
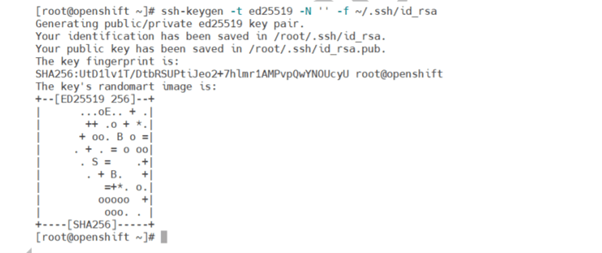
View the public SSH key:
$ cat ~/.ssh/id_rsa.pub

- The Installation Program’s Obtaining:
Visit the Red Hat OpenShift Cluster Manager website and click on the Infrastructure Provider page. Use your login information to access your Red Hat account. If you don’t have one, do so now. To create an account, refer to the Redhat subscription portion in the Pre-requisite section.
Open Infrastructure Provider by clicking this link: https://console.redhat.com/openshift/install
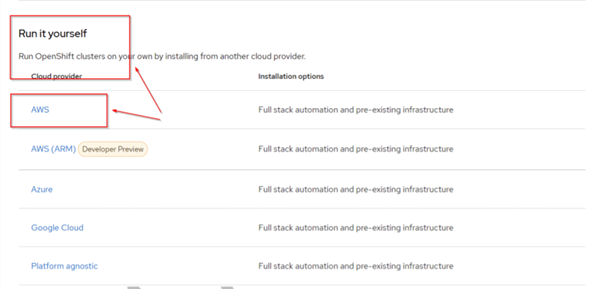
Log in to your cluster, scroll down to “Run it yourself,” then select “AWS.”

Avoid Contact Center Outages: Plan Your Upgrade to Amazon Connect
Learn the six most common pitfalls when upgrading your contact center, and how Amazon Connect can help you avoid them.
Unzip the installation software.
$ tar xvf openshift-install-linux.tar.gz
$ ls

- Installing Linux with OpenShift CLI:
Save the file after downloading the OpenShift v4.8 Linux Client entry.
$ cd /root/openshift
$ wget https://mirror.openshift.com/pub/openshift-v4/clients/ocp/stable/openshift-client-linux.tar.gz
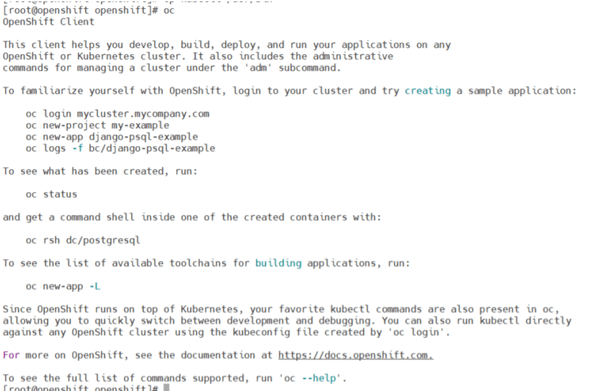
Check the installed client binary.
$ oc
Cluster Installation During Open Shift
Start the installation of the Openshift Cluster.
$ ./openshift-install create cluster –dir=/root/openshift –log-level=info
(This Cluster creation process will take 30-45 minutes)

Accessing the Cluster
- Using the command line (CLI), log on to the cluster:
Export the root user’s kubeadmin credentials.
$ export KUBECONFIG=<installation_directory>/auth/kubeconfig
$ echo ‘export KUBECONFIG=/root/openshift/auth/kubeconfig’ >> $HOME/.bashrc
To confirm you can properly execute oc commands using the exported configuration:
$ oc get nodes

Check that you can successfully execute kubectl commands using the exported configuration:
$ kubectl get nodes

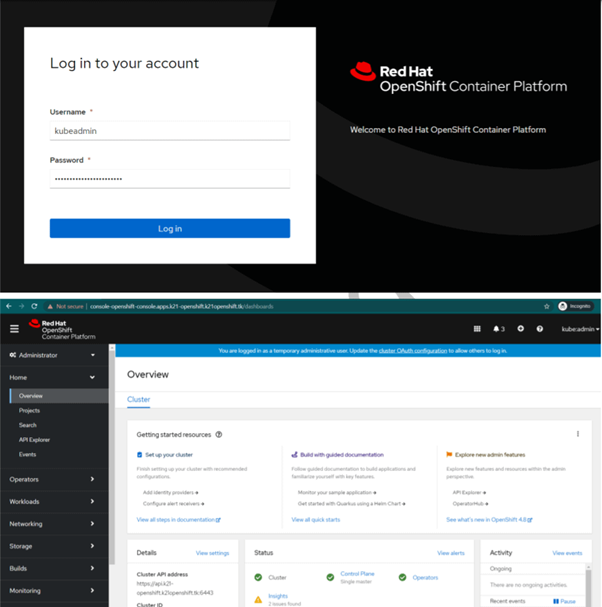
- Using the Web Console (GUI) to log into the cluster:
List the web console route for the OpenShift Container Platform:
$ oc get routes -n openshift-console | grep console

Copy the Portal URL from the installation command’s output.
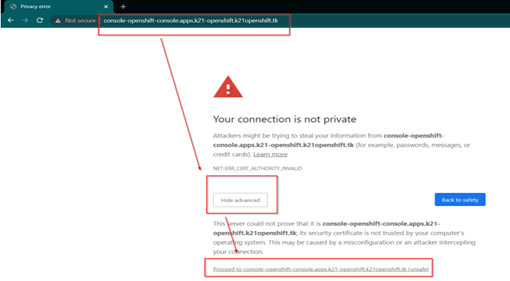
Log in using the output’s username and password:
Examine Cluster Logs
The OpenShift Container Platform installation log contains a summary of each installation. The log contains the necessary information to access the cluster if an installation is successful.
Examine the log file named.openshift install.log located in the installation directory on the installation host:
$ cat <install_dir>/.openshift_install.log
$ cat /root/openshift/.openshift_install.log
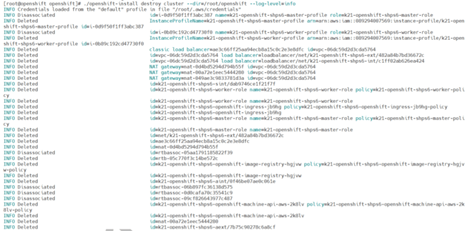
Eliminate the Openshift Cluster
Please use the following commands to remove the cluster:
$ sudo su –
$ cd /root/openshift
$ ./openshift-install destroy cluster –dir=/root/openshift –log-level=info
Conclusion
On OpenShift, there are numerous ways to deploy an application. In this post, I explained and demonstrated some of the simplest techniques for deploying an application on OpenShift OCP. You can deploy apps using container images if you already have all the necessary tools for building and storing images. Consequently, OpenShift is a fantastic solution for cloud-based container-based applications. It makes it very simple to develop, test, deploy, and maintain apps.