
Salutations! So you seek to assemble the science of scribing scribans in SXA? Look no further, for here in this four-part guide I will detail the amazing power and control that scribans in SXA offer.
The Four-Part Guide
• Part 1 – What are scribans, cloning the promo, adding a scriban
• Part 2 – Basic functions, some Do’s and Don’ts, and helpful links
• Part 3 – More scriban and Sitecore functions, including looping and rendering pages from a folder (TBD)
• Part 4 – Advanced scriban logic and visual shenanigans (TBD)
SXA Scriban Functions
Scriban templates have their own syntactical sugar and intricacies, described here. Sitecore also has some brief documentation on the custom functions it implements here. For this guide, we will use the “sc_field” function, and a bit of the special syntax and logic that the scriban templates use.
The Field Render Function
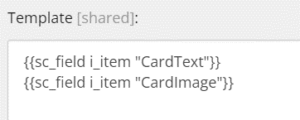
This function will render out the specified data item from the template. If the field is null, it will not render anything. For our card component, this will let us render out all our desired fields. Let’s start by throwing the title and image into the template field, no html, and see what we get:
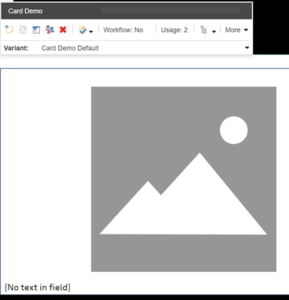
Without data in the rendering, Experience Editor will give is this:
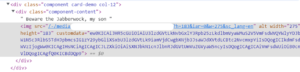
I put some data in it, so now the front end looks like this, with an HTML structure like so:

One problem we should perhaps rectify is that the text is not wrapped in anything. However, by default Sitecore has already wrapped our content inside two divs, which is something to remember when thinking about how to format your scriban, and what classes and elements if any you will want to add. Let’s add a div and an h3 tag, and I will modify the way we render our image slightly…

And these changes will give us this:


Now the screenshots may not make this obvious, but now our image is massive. And, let’s look at the HTML:
You’ll notice that we’ve lost a lot of our previous image data. I’ll talk more on that in the Do’s and Don’t section. Let’s change it back, and render out our link (populate the data fields with whatever you want):
And this should give us this:

My local has some pre-existing styles that are formatting the font and link in certain ways, but yours should look somewhat similar at least in structure.
Now let’s add that hover state from earlier. This will cause a fun problem that scribans have a great solution for. Feel free to try and play around with the scriban and styling to achieve the functionality on your own, but if you want to skip right to the scriban-related portion, just copy and paste the following bits of code:
{{sc_field i_item "CardImage"}}
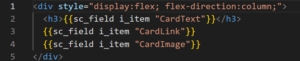
<div class="content-container">
<h3>{{sc_field i_item "CardText"}}</h3>
{{sc_field i_item "CardLink"}}
</div>
And the styling
.card-demo {
  max-width: clamp(250px, 350px, 650px);
  height: 200px;
  overflow: hidden;
  .component-content {
    position: relative;
    height: inherit;
    width: inherit;
  }
  img {
    height: 100%;
    width: 100%;
    object-fit: cover;
  }
  .content-container {
    display: none;
    position: absolute;
    background-color: #bababa;
  }
  &:hover {
    img {
      display: none;
    }
    .content-container {
      z-index: 2;
      display: flex;
      flex-direction: column;
      justify-content: space-between;
      padding: 0.5em;
      height: 100%;
      width: 100%;
    }
  }
}
Now try and go into the Experience Editor and edit the image. There may be a hacky method of still accessing the image, but I can no longer click the image, as the card hovers when I mouse over it. However, you can simply ask the scriban if you’re in Experience Editor mode:
![]()
{{ if (o_pagemode.is_experience_editor_editing) }}
Syntactically, you must pair this if with an ‘end’, and optionally an ‘else’. The following is an example of how that might look:

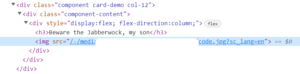
Additionally, Sitecore appends “scEnabledChrome” to the top level div while in EE. This is helpful if you have specific styles you want to apply. In our case, I will just modify the image selection so that it only occurs if a certain class is present, which I’ll remove in EE. This leaves me with a structure like this:
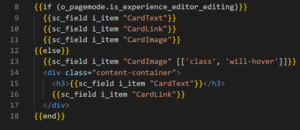
And with those changes, we now get a static text and image display in Experience Editor, but dynamic hover behavior otherwise.
Some Do’s and Don’ts
- Access items directly as little as possible.
- The change I made previously to the image directly access the data item, and pulled the URL raw. This has a couple of issues.
- If the image is null or no longer exists in the solution, this will render a nasty-looking error to the section of the page with the rendering.
- No other data except what was directly pulled will be processed. In the case of an image, you lose alt tags, width and height settings, and other elements a Content Author might add to an image. If you are rendering Rich Text Fields or links, similar problems can ensue.
- Doing this prevents Content Authors from editing the field directly while in Experience Editor.
- The change I made previously to the image directly access the data item, and pulled the URL raw. This has a couple of issues.
- Do not pair opening and closing tags within separate if checks.
- In the case of checking if a user is in Experience Editor mode or not, the following method will get extremely difficult to keep track of very quickly:

- I have never seen anyone advise doing it the above way, but I have seen it out in the wild. It was quite difficult to work with.
- Instead, split them up. When suddenly needing to edit a scriban, especially if it’s one you’ve never seen before, having EE and Preview split up will make solving the bug much easier:
- In the case of checking if a user is in Experience Editor mode or not, the following method will get extremely difficult to keep track of very quickly:
- IF the Content Author needs to be able to pass custom attributes on the element, do not pass those attributes as arguments.

- This will add “cta-class” to the image, but the following dialogue:
 will be overridden by any of the attributes passed in on the scriban.
- This will add “cta-class” to the image, but the following dialogue:
Some Helpful Links
That’s it for now! Look out for my next couple of blogs where I dive into some more advanced functions, I’ll link some articles on how to write your own custom functionality, and demonstrate how to use some of the custom functions people here at Perficient have built. Below I’ve listed some helpful links to advance your own salience in the scribing of scribans.
The Sitecore scriban documentation