
How do Oracle Cloud HCM workflow and approvals work? How do I configure that? How do I smoke test and then how the heck do I migrate these so that I don’t have to build them manually again? If you’ve ever asked yourself one of these questions, then hopefully this blog on Tips and Tricks for HCM workflow will help you on your journey.
Best Practices when gathering Requirements
- Keep it simple
- Don’t use users! Route to a role, AOR, approval group, or management hierarchy
- If it can’t be configured via BPM, then the rule is too complex
GETTING STARTED
There are two main configuration areas
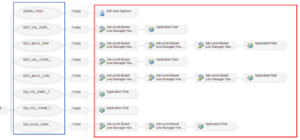
- Transaction console
-
- Quick and excellent for very basic workflow configuration
- One-stop-shop for configuring, testing, and monitoring workflow
- Very user-friendly, functional area. Best place to configure workflow nodes after the condition
- BPM
- A more robust and less functional configuration area with much more power, options, and reliability
- It’s required to use to configure complex conditional statements such as role-based clauses
The steps I would take to configure a new, complex workflow are:
- Prepare test data so that you can login as various initiators (admin, manager, manager+1)
- Start in the BPM area to configure
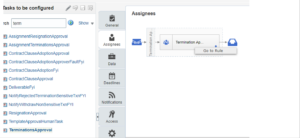
- Setup and Maintenance > Manage Approval Groups > Task Configuration > Search
- Enter the BPM approval configuration area
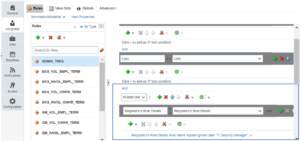
- Start a new condition and toggle advanced mode on
- Rule > Properties > Advanced Mode
- Input one of your conditional statements after the List is a List and Task is a Task objects
- Go back into the transaction console and add distinct approval paths for the two different conditions
- Submit a test transaction using your test data logins to verify that this condition is successfully met
- Go back into BPM and build out more conditions, one at a time (role based, country, worker type, etc.)
- Retest the complex conditions with test data
- Build out the workflow node paths in the Transaction Console and test all of them
There you have it. That’s how you can configure complex conditions in your approval rules. In my experience, it can be a large headache to try to configure conditions only via transaction console, with many rules failing or not routing with logic and reason. It’s worth the pain of learning how to use BPM to make the approval configuration process to be more seamless.
MISCELLANEOUS TIPS
- If the only result of a workflow is to send one or more FYI notifications, make sure to include an auto-approval node first after the condition block. Without this auto-approval node, the FYIs will fail.
- Approvals can be easily scoped and migrated using the SOA composer tool (Whitepaper)
- Workflow can be copied within the BPM area and pasted into another action type—this is very useful if the configuration between transactions is similar.
- Job-level based management hierarchy can only utilize minimum job level, so when designing the jobs make sure that the CEO is the highest job level.
Can you tell me how to copy a workflow in BPM to another action as you mentioned?