
Currently within the Transaction Matching component there is not a report or view that would show the actual matched transactions within a given match type. The only output users could view were reports displaying that a transaction matched and its corresponding matched ID. To provide visibility into what two transactions had been matched we created a customized report that could be exported to Excel. This export showed the matched transactions as well as any unmatched transactions. This view became extremely useful for users as they could also use this export to support their reconciliations.
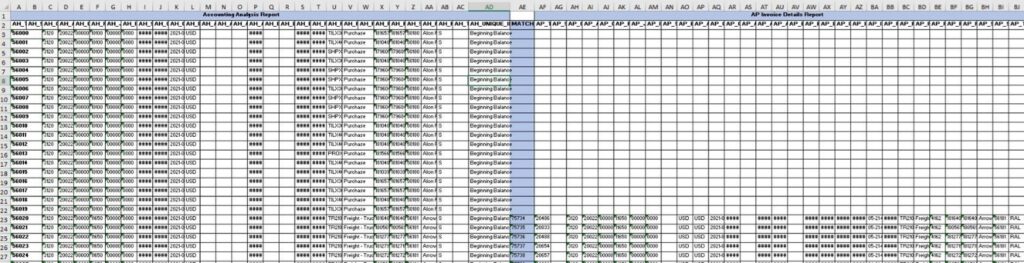
The illustration below is a segment of the report output to Excel. Col AE shows the Match ID (col highlighted in blue), and rows that display a value (e.g., row 23) show the transaction that was matched from the two sources. In the example below, row 23 displays the detail from Source One that matched with the detail from Source Two. If there is no Match ID displayed, then the transaction has yet to be matched.
The process to create the custom report is two-fold. First a query must be created to generate the values, then a report is created referencing the query.
To create the query:
- From the Home page, navigate to Application > Report Configuration.
- Click the + icon to add a new query.
- Enter the query Name and an optional Description.
- From the Type drop-down list, select Report Query.
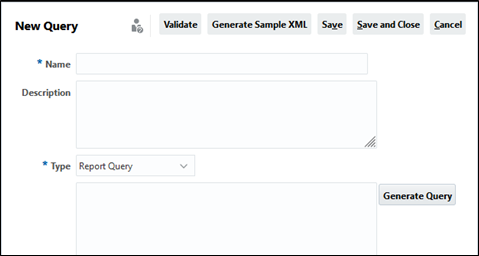
5. Click the Generate Query
The Generate Query dialog box displays.
6. From the Module drop-down list, select Transaction Matching.
7. From the Query drop-down list, select the applicable Transaction Matching data source to represent source one.
8. The Apply Security check box can be left unchecked. Click the Next
A list of available columns from the selected data source displays.
9. Select the columns to be displayed in the report. HINT: You can select all columns by clicking the Add All icon (>>) or select columns individually and add them to the Selected list by clicking the Add button (>).
10. Click the Next icon to select Filters.
11. If Filters are required, click the Create Condition button, and make the appropriate selections. Otherwise, click OK to return to the New Query
The query is generated automatically and displays in the Query section.
12. Click the Validate button to ensure the query is valid.

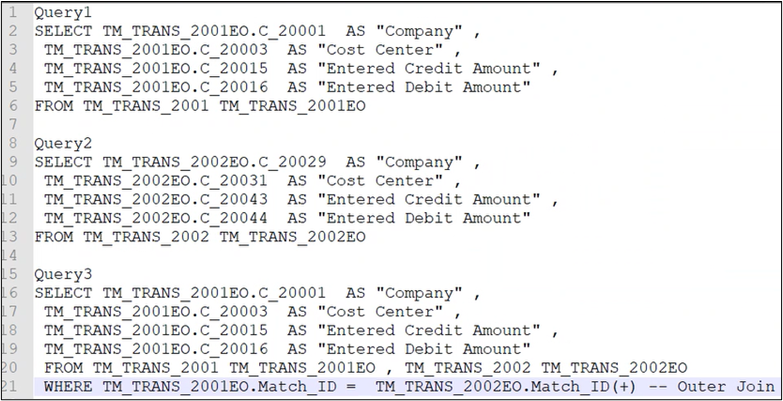
13. Copy the entire SQL query that was generated to Notepad to be used later.
14. Repeat steps 1-13 to create a query for the second data source.
15. From Notepad, copy the rows from the first query below the second query to create a third query. This is the query that will be used to build the report.
16. Make note of the Dynamic data source table TM_TRANS_<NUMBER>. In the example below the data source table for the first query is TM_TRANS_2001 TM_TRANS_2001EO. The data source table for the second query is TM_TRANS_2002 TM_TRANS_2002EO.
17. In the third query, create the outer join to join the two tables in a single query.
Below is a pseudo code for the query:
SELECT a.* ,b.*
From TM_TRANS_3000 a,
TM_TRANS_4000 b
WHERE a.match_id = b.match_id(+)
AND { Additional conditions to filter the required data)
18. Return to ARCS to build the third query.
19. Click the + icon to add a new query.
20. Enter the query Name and an optional Description.
21. From the Type drop-down list, select Report Query.
22. Do not click Generate Query, instead, paste the third query created in Notepad to the Query
23. Click the Validate button to check the query then click Save and Close.
To create the report:
- From the Home page, navigate to Application > Report Configuration.
- Select the Report tab from the bottom of the screen.
- Click the + sign to create a new report.
The New Report dialog box displays.
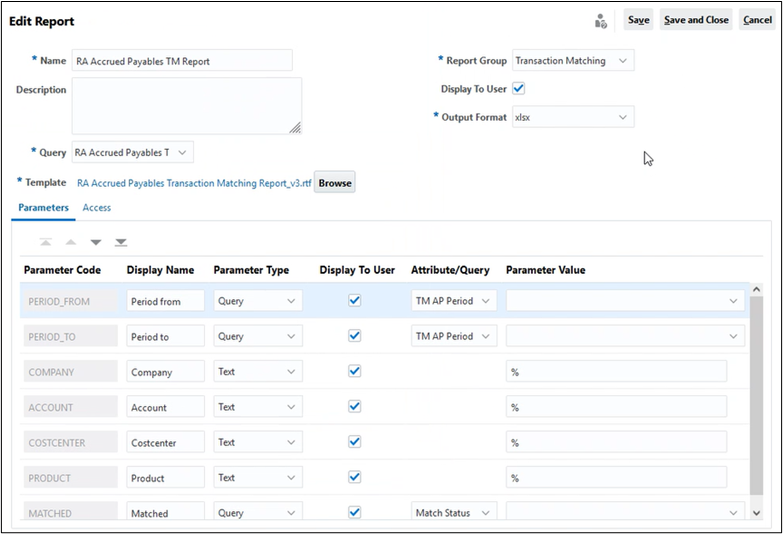
- Enter a Name.
- From the Query drop-down list, select the query you created in the previous steps. NOTE: After selecting the query, the Parameters section is populated with the query’s parameters.
- Browse for a saved template. NOTE: You will need to create a BI template with the columns from your query to be used for the report. https://www.youtube.com/watch?v=vuLEv0_EL4s
- From the Report Group drop-down list, select Transaction Matching. This will save the report to the existing Transaction Matching tab within Reports.
- From the Output Format drop-down list, select the applicable output format (e.g., xlsx).
- From the Parameters section, make any applicable changes to the Display Name, Parameter Type, etc.
10. Next you must grant access to the report. Click the Access
11. Click the + icon to add access by Role.
12. From the Application Module drop-down list, select Transaction Matching.
13. From the Role drop-down list, select the applicable role level to grant access to the report. HINT: You will need to add a row for each Role type that should have access.
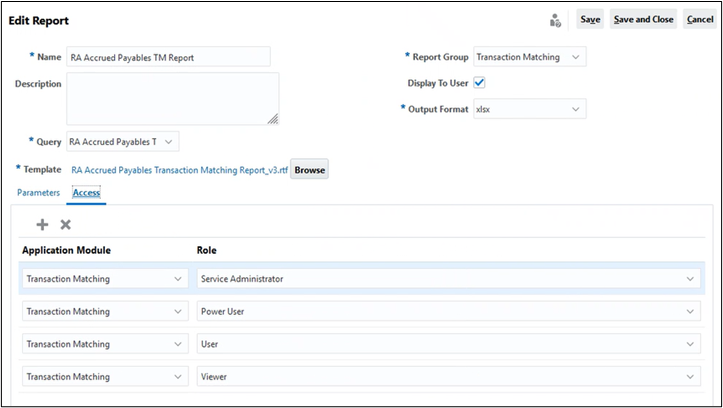
14. Click Save and Close.
15. After the Report is saved successfully navigate to Navigator > Dashboards > Reports.
16. Run the Transaction Matching report created.