
If you’ve worked with Python before, you’re probably familiar with the frameworks that Python deploys to quickly get a website up and running. If not, then you’ve come to the right place. Python is one of the most popular programming languages, and its ease of use and adaptability means that it’s used to create applications in almost every aspect of information technology (IT).
I’ve developed an interest in setting up small-scale Python websites using micro-web frameworks. As you might expect, Python provides a variety of framework options based on enterprise-scale requirements.
Understanding Micro-Web Frameworks
There are requirements that Python programmers need to understand to make their lives easier, such as frameworks. Frameworks reduce development time by automating the implementation of duplicate operations, allowing developers to focus more on application logic rather than routine parts.
One of them is Flask, a web application framework based on the Web Server Gateway Interface (WSGI). It has few or no external dependencies and doesn’t rely on any specific libraries, and it provides extensions that allow you to add extra needed functionality to your website and scale it up to complex apps.
On CentOS, we’ll build up a small Python application using the Flask micro-framework. Only a Linux machine with root privileges or a non-root user with pseudo capabilities is required to run Flask, and you’ll need the following to do so:
Python
Flask
virtualenv
We’re ready to install Flask and start building a simple website. Enter the following to update/install your EPEL repo: yum install epel-release
Then, to install and manage our Python components, we’ll install the python package manager: yum install python-pip python-devel gcc
We’ll then create a virtual environment to separate our Flask application from the rest of the Python files on the system: pip install virtualenv
Now, create the project directory for Flask with the following code:
mkdir ~/projectname
cd ~/projectname
Create a virtual environment with the tools provided: virtualenv projectnameenv
This will create a “projectnameenv directory” in your project directory, which will include a local copy of Python and pip, the package installer for Python. Now activate your “virtualenv” and install the following requirements: source projectnameenv/bin/activate
The prompt on your screen will change to signify that you’re now in the virtual environment. This is how the virtual environment will appear to you: (projectnameenv)user@host:~/projectname$. Next, install Flask after the activation with the following code: pip install flask.
We can develop a simple application now under your project directory now that Flask is accessible. Type “vim ~/projectname/projectname.py” inside your virtual environment and import the Flask render onto the webpage with the following code:
from flask import Flask
application = Flask(name)
@application.route(“/”)
def hello():
return “<h1 style=’color:blue’>Flask Web App</h1>”
The above basically defines what content to display when the root domain is reached. Instead, we can use a project python file to render our index.html, as seen below:
app = Flask(name)
@app.route(‘/’)
def home():
return render_template(‘index.html’)
if name == ‘main‘:
app.run(debug=True)
When you’re finished, save, and exit the program. You can test your Flask app by typing: python projectname.py inside your virtual environment.
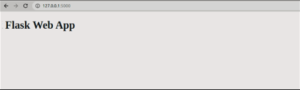
This should run the Flask app and you may see something like this:

In your web browser, type your server’s domain name or IP address, followed by the port number indicated in the terminal output (most likely: 5000). You should see something like this:
This is an example of a simple Flask setup. Although not overly difficult, there is an easier approach. If we look at Azure for doing this as we have done so far, the Azure app service will do so by default.
You’ll need a git repository to store your application code, and that’s it. To make a clone of the sample GitHub repository in your own GitHub account, go to GitHub’s website, and select Fork in the upper right corner of the GitHub page.

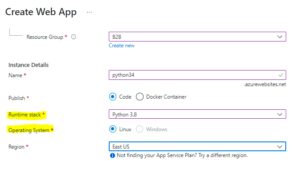
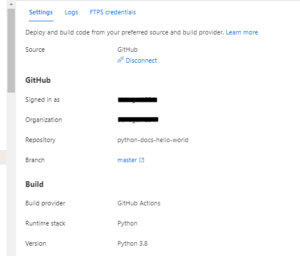
Create a Python Web App with a Python runtime stack and Linux as the operating system. After you’ve deployed a Python go to the deployment center and pick the GitHub account. Log in using your credentials and select the repository you recently forked.
![]()
When you save the modifications and go to the Web App URL, you’ll see the application code you’ve defined. If you look closely below logs, the newly built Web App is performing the identical tasks that we did manually on the Linux machine.
Similarly, if you want greater visibility into your environment, you can build it up manually and store it as a Docker image and upload it onto a public or private repository, from which you can create an Azure Web App. When establishing a Web App, choose one of the options below.
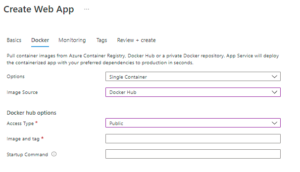

Note: If you’re using Docker, make sure your docker image port is open/exposed and you’ve configured SSH. You’ll be able to SSH the Web App this way, else the deployment will fail.
Utilize Python and Flask for Your Website
We’ve created a small Flask application in a Python virtual environment and something similar in an Azure environment. This allowed us to see how Flask is implemented in various environments. Flask is a very simple, but incredibly flexible framework for adding functionality to your applications without imposing too many restrictions on structure and appearance. To serve the Flask apps you create, you can utilize the general stack outlined in this article. For more information, contact our technical experts today.