
September 27, 2019.
Let’s talk about setting up MQTT in MQ v9.1.x. Remember that images are clickable for a sharper picture.
Introduction
Full name of MQTT is IBM MQ Telemetry v3 protocol, and it’s used for lightweight pub/sub between small footprint devices over unreliable networks. It uses TCP/IP as the backbone. Three Qualities of Service (QoS) are supported: “fire and forget”, “at least once”, and “exactly once”.
I’ll provide two examples of use cases for MQTT:
- A gas pipeline somewhere deep in Alaska delivering natural gas from far north to U.S. mainland. It has thousands of sensors that constantly send their data over to an MQTT server. Data includes temperature, particle density (for leak detection), pressure, etc. A queue manager receives these messages at regular intervals and distributes them to subscribers. Missing one set of messages is not critical, another one will arrive after a time interval has passed. QoS in this case can be set to “fire and forget” or “at least once”.
- Bedside medical devices next to hospital beds send similar data. Blood pressure, pulse, and other vital signs are sent at regular intervals (much shorter intervals if a patient is in intensive care). This time missing one set of vitals could be an indication of an emergency, and the networks in hospitals are much more reliable than in the wilderness. Thus, QoS in this case could be set to “exactly once”.
Technical Steps
How do we set this up?
Create a queue manager
First, we create a queue manager that will handle only MQTT traffic. The reasons for this are provided below. It’s a regular queue manager with all of your standard settings (including TLS as described in one of my previous posts).
Setup JAAS
Second, if you’re using LDAP authentication, you will need to modify a Java Authentication and Authorization Service (JAAS) configuration file for MQTT.
For shared file systems (multi-instance queue managers), it will be here:
/shared/qmgrs/QM1/mqxr/jaas.config
For stand-alone queue managers the file will be here:
/var/mqm/qmgrs/QM1/mqxr/jaas.config
Modify the entry inside to look like the next example. You can find this information in your LDAP connection authentication object on the queue manager:
MQXRConfig {
com.ibm.security.auth.module.LdapLoginModule REQUIRED
userProvider=”ldaps://ldap-server1.domain.com:535/ou=people,dc=unix,dc=domain,dc=com ldaps://ldap-server2.domain.com:535/ou=people,dc=unix,dc=domain,dc=com”
userFilter=”(&(uid={USERNAME})(objectClass=inetPerson))”
debug=false;
};
Define a service
Next, we create an MQTT service. The name has to be SYSTEM.MQXR.SERVICE. The rest of the parameters are standard and are provided by the MQ installation:
DEFINE SERVICE (SYSTEM.MQXR.SERVICE) CONTROL(STARTONLY) + SERVTYPE(SERVER) + STARTCMD(‘+MQ_INSTALL_PATH+/mqxr/bin/runMQXRService.sh’) + STARTARG(‘-m +QMNAME+ -d “+MQ_Q_MGR_DATA_PATH+” -g “+MQ_DATA_PATH+”‘) + STOPCMD(‘+MQ_INSTALL_PATH+/mqxr/bin/endMQXRService.sh’) + STOPARG(‘-m +QMNAME+’) + STDOUT(‘+MQ_Q_MGR_DATA_PATH+/errors/mqxr.stdout’) + STDERR(‘+MQ_Q_MGR_DATA_PATH+/errors/mqxr.stderr’)
Then we start the service:

START SERVICE (SYSTEM.MQXR.SERVICE)
At this point I found it necessary to restart the MQ Explorer (MQE) to pick up the service, and allow browsing of the Telemetry folder.
Define a channel
Next step is to define a channel. Note that you will need one port per channel. Also note that SSLCAUTH (NEVER) sets up one-way authentication. Set SSLCAUTH (REQUIRED) to enable two-way or mutual authentication:
DEFINE CHANNEL(‘QM1.MQTT’) CHLTYPE(MQTT) TRPTYPE(TCP) PORT(1884) LOCLADDR(‘ ‘) BACKLOG(4096) + MCAUSER(‘ ‘) USECLTID(NO) SSLCIPH(‘SSL_ECDHE_RSA_WITH_AES_256_GCM_SHA384’) SSLCAUTH(NEVER) + JAASCFG(‘MQXRConfig’) SSLKEYR(‘/var/mqm/qmgrs/QM1/ssl/key.kdb’) + SSLKEYP(‘password’) PROTOCOL(‘HTTP,MQTTV311’) replace
Set default transmission queue
As the last step we need to change the default transmission queue of the queue manager to SYSTEM.MQTT.TRANSMIT.QUEUE:
ALTER QMGR DEFXMITQ (SYSTEM.MQTT.TRANSMIT.QUEUE)
After starting the service and the channel, you’re ready to use MQTT pub/sub.
MQTT Subscriptions
In order to transition to the next phase, we need a little bit of theory.
There are two ways for the MQTT subscriptions to work.
- Make SYSTEM.MQTT.TRANSMIT.QUEUE the default transmission queue on the queue manager.
- Create a queue manager alias named the same as the client id. The client id must also be the name of a remote queue manager. A queue manager alias is a remote queue definition that allows administrators to redirect messages.
MQTT setup example:
DEFINE QREMOTE (mike123) RNAME(‘ ‘) RQMNAME(mike123) XMITQ(SYSTEM.MQTT.TRANSMIT.QUEUE)
Approach two is tedious to setup and cumbersome to administer. You will need at least one queue manager alias for each work account that wants to use subscriptions. It could turn into a micro-management nightmare when hundreds of accounts are involved. There is one benefit in this approach: controlled access on who can subscribe.
Approach one is a much better option, but there is a reef we need to avoid. If a queue manager that is not part of a cluster puts a message onto a remote queue, the default action is to use the default transmission queue. In approach I. that queue will be defined as SYSTEM.MQTT.TRANSMIT.QUEUE. Now a scenario is possible when a remote queue is defined that doesn’t have a transmission queue defined, and the queue manager will use the default transmission queue. A message, not intended for MQTT, will be sent to MQTT subscribers. For this reason a dedicated queue manager is advisable for MQTT configurations.
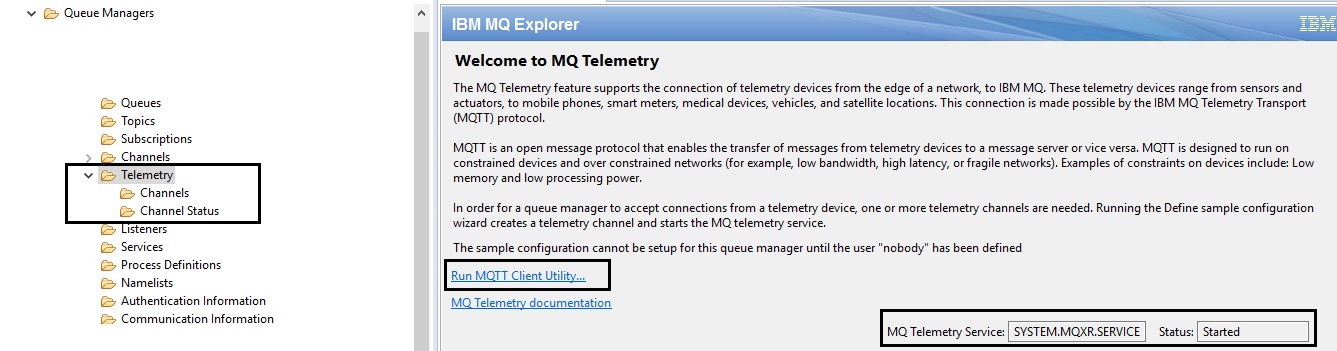
Using MQ Explorer
In MQE you can see and administer the objects we created. Some screenshots.
MQTT channel:

MQTT service:
![]()
MQTT Utilities
There are two ways you can smoke-test your configuration.
An MQTT Client utility can be launched from MQE:
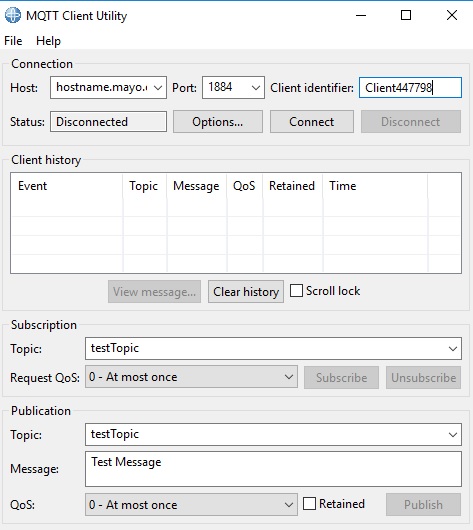
A browser can be directed to the channel’s hostname and port. For example, if your queue manager is running on hostname.domain.com and you created an MQTT channel on port 1884, then use URL: https://hostname.domain.com:1884.

You can use both utilities to create a topic, send a message and receive it over a subscription.
Have fun!