
Amazon Connect provides basic outbound calling capabilities out-of-the-box. The Outbound Contact API is an extension of that functionality that allows for more flexibility with automating outbound calling. You can implement click-to-dial from the web, based on a voice notification, a scheduled payment reminder, a scheduled post-work survey, etc.
For more information, please see the official documentation pages: Announcement, API documentation.
In this blog post, we create a simple calling application using the Amazon Connect Outbound Contact API. We build the back end for placing a call to a customer’s phone number while addressing some common misconceptions about the Outbound API.
Setup

- Click-to-call website – This component invokes the back-end logic. We can imagine it as a web form that asks a customer for their phone number and name in order to get on the phone with a representative.
- Lambda function – A simple NodeJs Lambda function that invokes the Outbound API.
- Amazon Connect Outbound API – The piece that does the heavy lifting. The Outbound API places the call into an Amazon Connect Contact Flow.
- Amazon Connect – Contact Flow engine handles the call received from the Outbound API, using inbound flow logic. Yes, INBOUND flow, bare with me. Once the API places a call into the Contact Flow engine, there’s no difference in caller experience using this method vs. dialing into an inbound flow. From there, an Amazon Connect administrator can decide what happens to the call. It can end in a queue waiting for a representative, play an automated reminder and hang up, etc.
- Customer’s phone – Assuming a call went to a queue, a customer would get connected as soon as an agent is available to assist.
Invoke the Outbound Contact API
Ok, let’s build this application! We trigger the Outbound Contact API from a NodeJs Lambda function. The AWS in-line code editor makes it convenient to try out a demo function. For instance, you can reach AWS-SDK methods directly without installing anything locally. The AWS-SDK also allows us to use the Outbound API with other programming languages.
At the time I’m writing this, the Outbound API supports two actions: starting a call (StartOutboundVoiceContact) and ending a call (StopContact).
Prerequisite #1 – Lambda Permission
In order to use the Outbound Contact API actions through a Lambda function, you will need to grant Amazon Connect Start Voice Contact permission.
See the sample IAM Policy below:
{
    "Version": "2012-10-17",
    "Statement": [
        {
            "Sid": "VisualEditor0",
            "Effect": "Allow",
            "Action": "connect:StartOutboundVoiceContact",
            "Resource": "*"
        }
    ]
}
Attach this IAM policy to an IAM role, then use that role to run the Lambda function. In addition, I would also recommend adding a CloudWatchLogs write permission to allow the function to write logs.
Prerequisite #2 – Input parameters

Avoid Contact Center Outages: Plan Your Upgrade to Amazon Connect
Learn the six most common pitfalls when upgrading your contact center, and how Amazon Connect can help you avoid them.
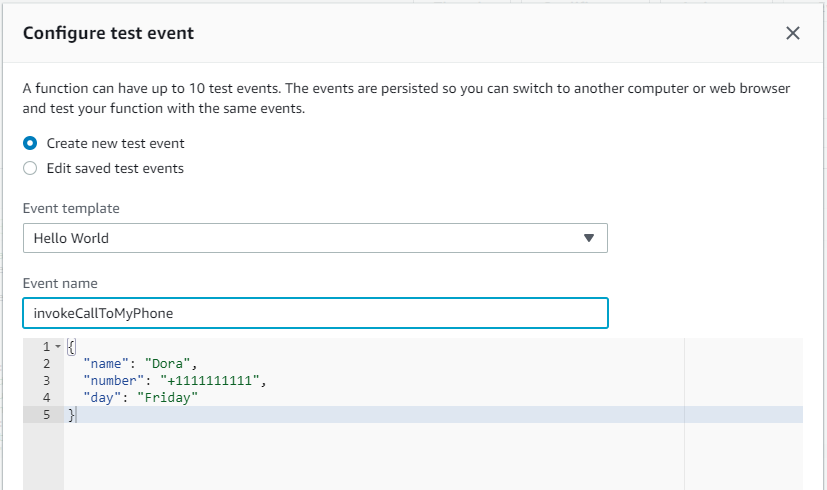
This application will take in a customer’s phone number, name and day of the week. It’s up to you to collect the input parameters in a preferred way; this can easily turn into a click-to-dial web form. For this blog post, we create the sample JSON input event within the Lambda interface.
{
  "name": "Dora",
  "number": "+1111111111",
  "day": "Friday"
}
To test a Lambda with an event, navigate to the AWS Management Console and go to your new Lambda Function. There should be a Test drop-down in the upper right-hand side; create a new test event using this JSON sample event and enter your own data points. It should look something like this:
Sample Lambda function
const AWS = require('aws-sdk');
AWS.config.update({ region: 'us-east-1' });

exports.handler = (event, context, callback) => {
    let connect = new AWS.Connect();

    const customerName = event.name;
    const customerPhoneNumber = event.number;
    const dayOfWeek = event.day;

    let params = {
        "InstanceId" : '12345l-abcd-1234-abcde-123456789bcde',
        "ContactFlowId" : '987654-lkjhgf-9875-abcde-poiuyt0987645',
        "SourcePhoneNumber" : '+1123456789',
        "DestinationPhoneNumber" : customerPhoneNumber,
        "Attributes" : {
            'name' : customerName,
            'dayOfWeek' : dayOfWeek
        }

    }

    connect.startOutboundVoiceContact(
        params, function (error, response){

            if(error) {
                console.log(error)
                callback("Error", null);
            } else
            {
                console.log('Initiated an outbound call with Contact Id ' + JSON.stringify(response.ContactId));
                callback(null, 'Success');
            }
        }
        );


};
Let’s see what’s going on here. The StartOutboundVoiceContact action takes in the following required parameters:
- InstanceId – Amazon Connect Instance ID (not the full ARN, just the ID. It’s going to look something like 12345l-abcd-1234-abcde-123456789bcde). Find this string in the AWS Management Console > Amazon Connect > Your instance details.
- ContactFlowId – Amazon Connect Contact Flow Id – The call flow that will manage call experience before an agent picks up (IVR logic).
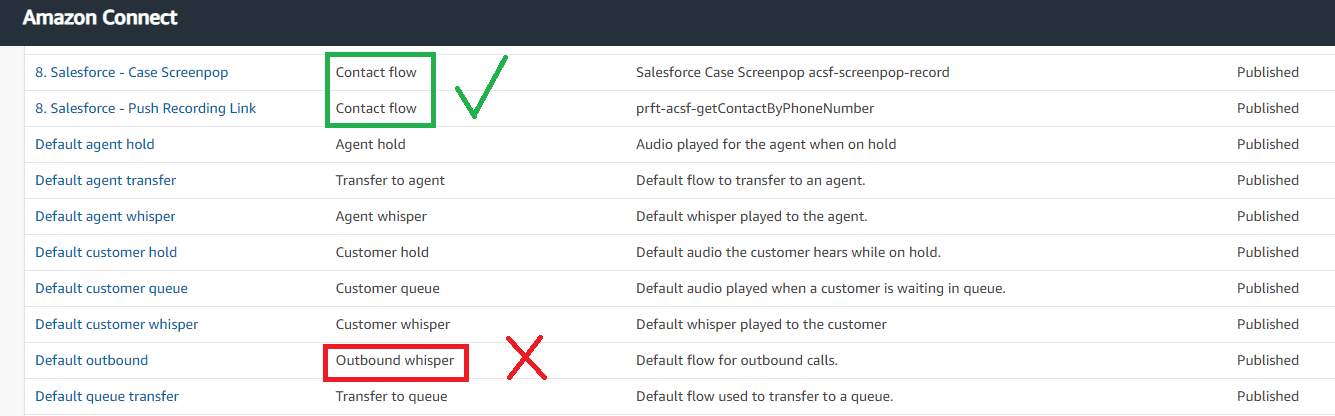
Tip: Make sure you create a contact flow that is of type “Contact Flow”. “Outbound whisper” flow type is not a correct type for this design, it’s used for another purpose in the system. Trust me, I learned the hard way.
3. SourcePhoneNumber or QueueId – An Amazon Connect number, i.e. a contact center number that will be used to place the call FROM. Alternatively, you can specify a QueueId instead of the SourcePhoneNumber, as a queue is related to an outbound calling number anyway (so the call would originate FROM the number tied to that queue).
4. DestinationPhoneNumber – TO whom should the call go to? This is the customer’s phone number, the end destination number.
The StartOutboundVoiceContact action can take more optional parameters through the Attributes section. Specify a key-value pair through an attribute map to pass any additional data points. The same attributes will be available for use within the Amazon Connect contact flows.
In this example, we pass the customer’s name and day of the week as optional parameters. Yes, you did notice that correctly, I’m imagining it’s Friday.
Amazon Connect Contact Flow
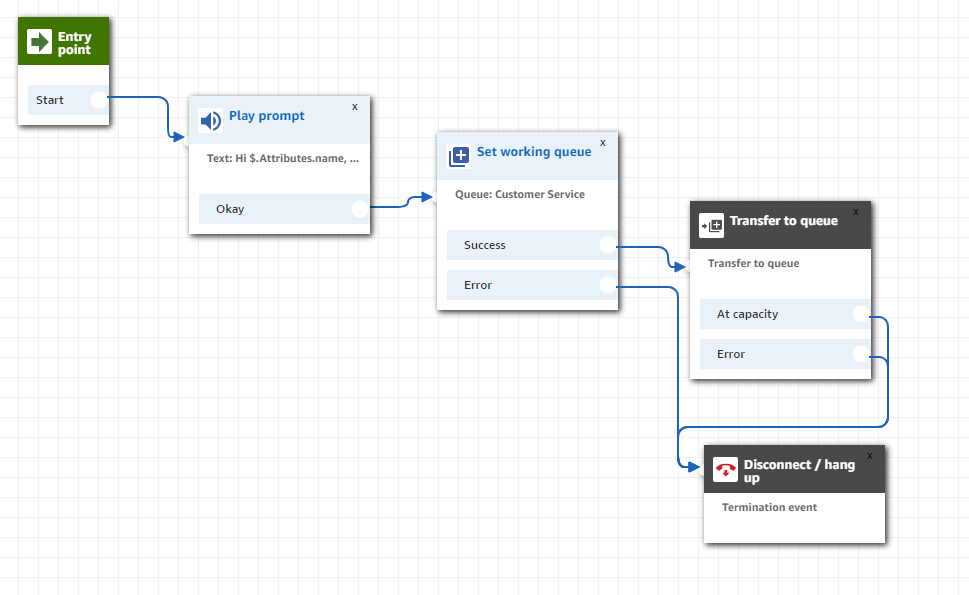
Create a new Amazon Connect Contact Flow (not the Outbound Whisper flow) and add the following blocks:
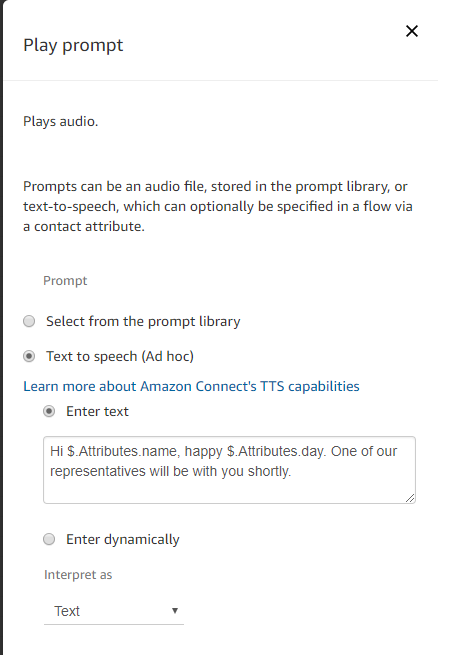
Here’s how you can pass the attributes within a Prompt block; essentially this is what the customer will hear back.
That’s about it! Hopefully, you’ve followed through and you’ve placed your first outbound call. Thanks for reading and feel free to reach out with any questions or comments.
Amazon Connect is commendable and the Click-to-call website sound awesome amongst others. Hostaccent is reliable for webhosting. They offer Powerful Premium Web Hosting, Windows Hosting, Cloud Hosting, Reseller Hosting, VPS Hosting, WordPress Hosting, Dedicated Servers, SSL Certificate. Their prices are competitive and they are best among equals when it comes to webhosting.
Sign up with Hostaccent and discover why they are the best.
How the lambda function will trigger while i will call through ccp?
Hi Steve! In terms of this blog post, the lambda function should be triggered by an action such as click-to-call support on a website. This would place a customer call into the queue to be answered by the next available agent.
If you need direct access to an agent’s CCP the Streams API is the way to go.
not sure how you figured out the Attributes can be accessed under $.Attributes but that saved me. I was using $.External