
Welcome back! Last time, in part 2 of the Direct Routing for Microsoft Teams Deep Dive we discussed the Direct Routing call flow with and without media bypass in place. In this blog article, we will discuss the configuration aspects of Direct Routing.
When talking about the configuration aspects of Direct Routing, it is important to understand the solution components that are involved with Direct Routing. As you will see in the diagram below, the solution components are separated into 3 major sections:
- Microsoft
- Customer
- Carrier/PSTN Provider
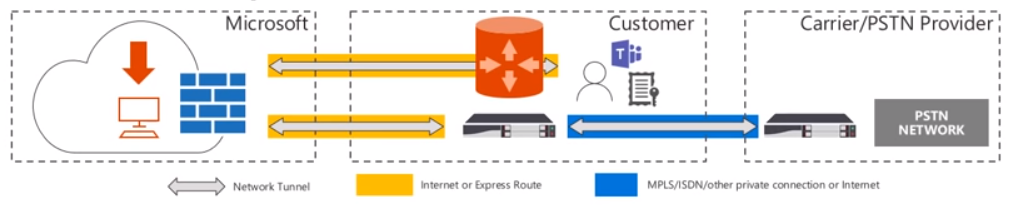
The first section is Microsoft provided components. Microsoft provides the customer with the following:
- Phone System
- Teams Client
- Support (including incident transfers between Microsoft and the SBC vendors)
- If a support case is opened with Microsoft and the support engineers determine there is a misconfiguration on the certified SBC, Microsoft will transfer this case accordingly instead of making the customer open a separate incident.
- Configuration guidance/documentation
The second section is the Customer provided components. The customer (being you) will need to provide access to:
- Proper licensing for Phone System (E3 + Microsoft Phone System License Add-on OR E5)
- Contract with your telco provider/carrier
- Supply a supported SBC (including the support contract)
- Access to the SBC from O365
- Via Internet or Express Route
- Certified SBC must have:
- Public IP
- FQDN
- Certificate
- Configuration of the SBC with O365 and Carrier (can be Microsoft partners)
The last section is the Carrier provided components. This includes:
- Telephony trunk
- T1/E1 into SBC
- SIP trunk directly from carrier
- Support
Now that we have covered the basics on components involved in Direct Routing, let’s take a look at the IP ranges and ports that are required.
IP Ranges and Ports
As you will see in the diagram below, on the left hand side will be a set of IP addresses listed for both the SIP Hub and Media Processors (MP).
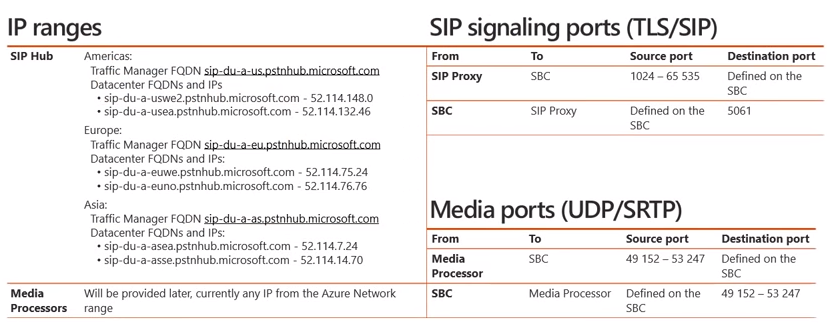
As mentioned in part 1 on call flows, signaling will traverse through the SIP Hub component whereas media will traverse through the various Media Processors (MP’s), assuming we are not using media bypass. If we focus on the SIP Hub aspect, you’ll recall there are 3 different geographies where Direct Routing is deployed, Americas, Europe, and Asia. As you can see, each geographic datacenter location has a corresponding FQDN and IP address that is required to be able to access the signaling channel for Direct Routing. From a media perspective, Microsoft does not currently offer a fixed IP address range, however this will be provided at a later date. Currently, the request from the MP could come from any IP address located within the Azure Network range. To determine this network range, you can utilize the URL here. Now if we move to the right hand side of the diagram you will see SIP signaling ports (TLS/SIP) as well as Media Ports (UDP/SRTP). From a SIP signaling port perspective, when the SIP proxy in O365 talks to the SBC it will utilize a source port (1024 – 65,535) and it will utilize a destination port that you will define on the SBC when you configure it. The traffic that traverses from the SBC to the SIP proxy will utilize a source port that we define on the SBC and the SIP proxy within O365 will be listening on port 5061. From a media perspective, media will use UDP/SRTP. Media that flows from the MP in O365 to the corresponding SBC will utilize the source port (49,152-53,247) and a destination port defined on the SBC. Likewise, the reverse traffic from the SBC to the MP will utilize the source port that you have defined on the SBC and the corresponding destination port (49,152-53,247). Now that we have considered the necessary IP address and port ranges required for Direct Routing, let’s discuss the FQDN that will be used for the SBC.
SBC FQDN
When you first register your O365 tenant you will receive a default name that ends in .onmicrosoft.com. Any *.onmicrosoft.com domain names are not supported as SBC names. That said, in order to use Direct Routing you will need to add at least one custom domain to your O365 tenant. For example, in the diagram below you will see that contoso.onmicrosoft.com cannot be used as an SBC FQDN thus we would add contoso.com to our O365 tenant.

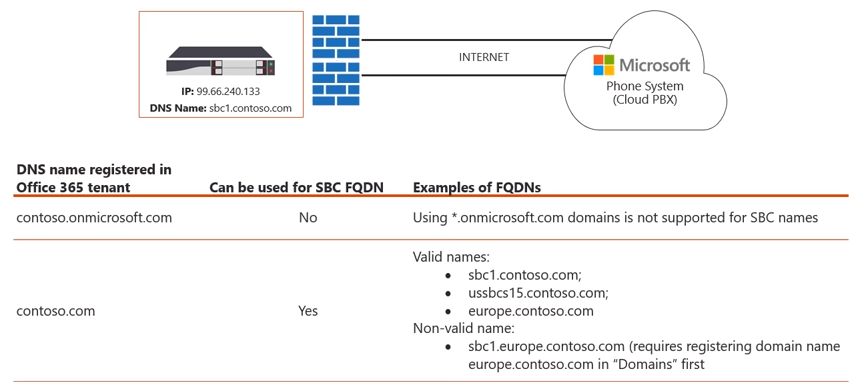
Once added, you can then utilize a series of names for the SBC (as seen above). Any of the FQDN’s would be valid names as they are mapped to the corresponding DNS name registered within O365 tenant.
Note: You cannot register/utilize sub-domains (as seen above).
Obtaining the certificate for SBC
So what if you have multiple domains, i.e. contoso.com & adatum.com? Well the good news is, you won’t have to create SBC FQDN’s for every domain that you have. It is sufficient to create one FQDN for your SBC and have it serve all of the users no matter what domain name they use. Now that we have the firewalls open for the correct IP’s and port ranges as well as a corresponding name for the SBC, our next step is to obtain a certificate for the SBC. As you will see in the diagram below, there are 3 scenarios to go about this:

Scenario 1: Minimizing Certificate Cost
This scenario is the most straightforward scenario, which is to just request a wildcard certificate. In this instance, whether we have 1 or 10 SBC’s we can identity a certificate with *.contoso.com and we can utilize this certificate on all various SBC’s. In some scenario’s this may not be the most ideal choice. For example, maybe the SBC’s are in an unmanaged/unsecured location or maybe your organization just doesn’t feel comfortable having a wildcard certificate on the particular SBC.
Scenario 2: Balance the cost and security
This scenario allows the best of both worlds (cost and security). In this scenario you would not use a full wildcard like in the previous scenario, instead you would include the name of each SBC in your SAN field of the certificate. As shown in the diagram above, the SN (subject name) for this particular certificate is gw1.contoso.com but then we have added the SAN entries of gw1.conotoso.com, gw2.contoso.com, gw3.conotoso.com, and gw4.contoso.com to the certificate. This balances out the security aspect since you won’t have a wildcard certificate and is more tailored to the specific SBC names.
Scenario 3: Maximize Security
This scenario allows for maximum security since we have a separate certificate for each SBC. However, this will also cost more than the previous two scenarios, so this should be taken into account when making your decision on which scenario suits your organization best.
Lastly, on the diagram above you will see a list of supported certificate authorities. This list is current as of June 2018 but it is recommended to always check Microsoft’s docs articles just in case.
Pairing the SBC
So far we have configured our firewall to allow connectivity to the proper IP ranges and port ranges, added the proper FQDN(s) to our SBC, and we have obtained a certificate for our SBC. Now it is time to pair SBC with O365. To do this, we must first establish a remote PowerShell session to O365. From there we can utilize the “New-CsOnlinePSTNGateway” cmdlet. In the screenshot below you will see an example of this cmdlet.
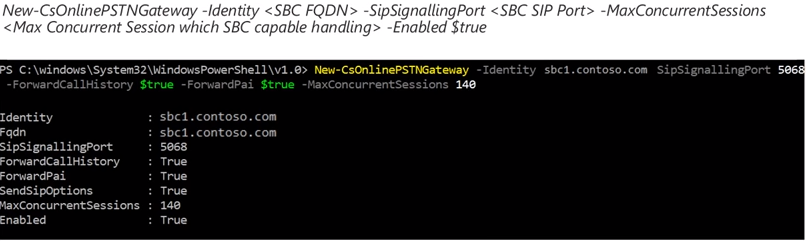
Some of the parameters in with this cmdlet include:
- FQDN of SBC
- SipSignalingPort – Ports defined on SBC
- MaxConcurrentSessions – Determines number of calls SBC can handle. This is used to use intelligent routing decisions
- ForwardPAI – Indicates whether P-Asserted Identity header is forwarded along with the call. This header provides a way of identifying a caller.
- By default this value is false
- ForwardCallHistory – Indicates whether call history information will be forwarded through the trunk. If enabled, 2 additional headers will be sent (History info & Referred by).
- By default this value is false
- SIPOptionsEnabled – This is a critical parameter, because it allows the heartbeat between the SBC and O365.
- You will want to make sure this parameter is left as enabled.
- Enabled – It is possible to set the SBC to “-Enabled $false” such as when you are performing maintenance on the SBC and want to drain any of the connections as well as not allow any new connections.
- If this is the only SBC in the route, the “Enabled” parameter is ignored. Even if “Enabled” is set to false calls will continue to send calls to the endpoint. This is because routing the call is more critical than determining that there is only a single SBC with the “Enabled” parameter set to false. You will want to put this into consideration when architecting your Direct Routing topology and ensure you have appropriate HA and backup routes as necessary.
- EnableFastFailoverTimer – When set to 10 (default value), outbound calls that are not answered by the gateway within 10 seconds are routed to the next available trunk
- If there are no additional trunks, then the call is automatically dropped. In an organization with slow networks and gateway responses, that could potentially result in calls being dropped unnecessarily. The default value is 10.
For more information on this cmdlet please see the Microsoft documentation on Direct Routing.
In this article we discussed various configuration aspects of Direct Routing. Stay tuned for part 4 of the series because in the next article we discuss some of the SIP syntax for the SBC itself as well the user provisioning and voice routing aspects for Direct Routing.