Target audience: Mid to Highly skilled Linux, WAS and AWS admins.
WebSphere Application Server (WAS) and WAS based Products have built-in capacity to be highly available(HA) and auto scale. This article gives one of many potential WAS Architecture designs that utilize AWS components.
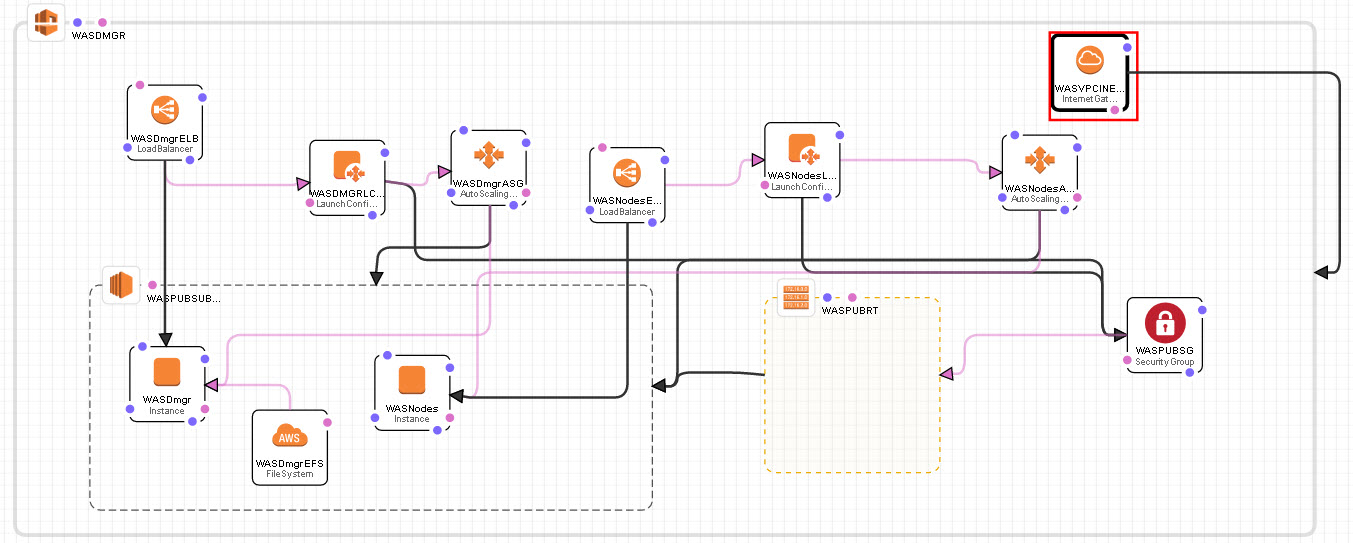
The picture below depicts a WAS Cell with an HA WAS deployment Manager(Dmgr) and 1…N WAS nodes in a horizontal cluster. Parts of the HA design will use WAS built-in feature and the rest will utilize the AWS infrastructure components.

Again, this is a high-level design and the details will need to be worked out with a specific client. Internet domains, SSL/TLS and certs are not covered. These items will also need to be incorporated to the client’s specifications.
The process to create this WAS HA Cell using AWS.
Create the WAS Cell on AWS:
- Create a VPC for WAS that has a public subnet, Internet Gateway, Security Group, Network ACLs and Routing Table. These AWS components will be created and configured to a client’s specifications. The Security Group and Network ACLs should include WAS port range and should limit who can get to the WAS Cell from the internet.
- Create an instance of one of the AWS AMI’s that meets the client’s virtual machine specfications.
- Upload the WAS software on it.
- Install WAS, No profiles.
- Then save that AMI as a custom WAS base AMI. This will be the AMI you select as you model the WAS HA Cell.
- Create an AWS EFS file system and mount it to the current AMI instance.
- Set up the /etc/fstab so the EFS file system mounts on bootup.
- Create a WAS Dmgr profile and put it on the EFS drive.
- Start the Dmgr.
- Create a WAS cluster with zero members.
- Now write a scripts.
- The script will execute at bootup. Call it Dmgr_startup.
- It will start the Dmgr.
- Put Dmgr_startup script in /etc/init.d
- chmod 755 /etc/init.d/Dmgr_startup
- chkconfig –add Dmgr_startup
- chkconfig Dmgr_startup on
- Check it: chkconfig –list Dmgr_startup
- Now save this instance as your WAS Dmgr AMI.
- Now delete the Dmgr instance.
- Now create a Launch Configuration/Auto Scaling Group and use the WAS Dmgr AMI for the instance.
- The auto scaling group will be a scaling group of 1.
- Start the Launch Configuration
- Now create an Elastic Load Balance for the Dmgr
- Add the Dmgr Instance and have it monitor the WAS Dmgr admin port or the WAS dmgr soap port of the Dmgr instance. These port numbers will vary if the client chooses not to use standard WAS ports.
- Modify the Auto Scaling Group to use the Elastic Load Balancer as its health check.
- Test your configuration by using a Web Browser to hit the ELB IP and admin port of the dmgr(WAS admin console).
At this point you will have:
- The Elastic Load Balance IP address for the Dmgr.
- The Dmgr WAS soap port.
- The Dmgr WAS cluster name.
Create the WAS Node(s) on AWS:
- Create another EC2 instance using the WAS base AMI put it in the WAS VPC.
- Now write two scripts(combo of shell and jython using the information you have from the Dmgr instance). Use a naming convention that adds the short host name to the profile, node and server names:
- The first script will execute at bootup. Call it WAS_startup.
- It will create a was node profile.
- It will federate the node to the Dmgr
- It will create a WAS server and add it to the WAS cluster.
- Put WAS_startup script in /etc/init.d
- chmod 755 /etc/init.d/WAS_startup
- chkconfig –add WAS_startup
- chkconfig WAS_startup on
- Check it: chkconfig –list WAS_startup
- The second script will execute at shutdown
- It will delete the WAS server
- It will un-federate the node from the Dmgr
- It will chkconfig WAS_startup off
- Put WAS_shutdown in /lib/systemd/system-shutdown/
- Note: this location may vary with different flavors of UNIX/LINUX.
- chmod 755 /lib/systemd/system-shutdown/WAS_shutdown
- The first script will execute at bootup. Call it WAS_startup.
- Now save this instance as your WAS Nodes AMI.
- Restart the instance to see these scripts work.
- Upon reboot, In the WAS admin console you should see a new node federated and a new server added to the Cluster.
- Upon shutdown, you should see the node and server removed from the WAS admin console.
- Delete the instance.
- If the results were as expected in bullets 5 and 6 then move on. Otherwise go back to step 1 and debug your scripts.
- Now create a Launch Configuration/Auto Scaling Group and use the WAS Nodes AMI for the instance.
- The auto scaling group will be a scaling group of 1 … N. The group should cross Availability Zones(AZ). Select a metric that will allow the group to grow and shrink as the load changes.
- Start the Launch Configuration.
- Now create an Elastic Load Balancer for the WAS nodes and have it monitor a metric that will allow the group to grow and shrink as the load changes.
- Modify the Auto Scaling Group to use the Elastic Load Balancer as its health check.
- Test your configuration by using a Web Browser to hit the WAS Nodes ELB IP. Use a load generation tool to increase and decrease web traffic.
Can you please share the sample scripts as well for creating the Nodes and federate it with the Dmgr?
No I cannot. The article is targeted to WAS consultants. Any artifact associated with this article are the property of Perficient.