Sitecore 9 is out we are all excited to jump in and start using the latest and greatest. So let’s jump in and setup for an XP0 Sitecore installation on our local development machine!
George Chang, another Perficient Sitecore MVP, put out a great blog post on How to install Sitecore 9 with the Sitecore Install Framework (SIF), which is the new way to install Sitecore 9. However, it doesn’t elaborate on the basic setup and preparation before running SIF and Windows PowerShell to get your local developer setup of a Sitecore 9 XP0 instance up and running. That is what we will be covering here in this blog post, and when finished you can refer to George’s article to finish out the installation.
Step 1 – Pre-Requisites:
- Microsoft PowerShell® version 5.0 or later
- Web Platform Installer 5.0
- WebAdministration module (Automatically installed when you configure a computer with IIS)
- Web Deploy 3.6 for Hosting Servers (Install with Web Platform Installer)
- URL Rewrite 2.1 (Install with Web Platform Installer)
- Microsoft SQL Server Data-Tier Application Framework (DAC Fx) version 17.1 (Install with Web Platform Installer)
- Microsoft SQL Server Transact-SQL ScriptDom (Install with Web Platform Installer)
Enable Contained Database Authentication by opening up SQL Server as an Administrator and executing the following script query:
sp_configure 'contained database authentication', 1
GO
RECONFIGURE
GO
This is modified from what was in the installation guide as what was in the guide had incorrect syntax. You should receive a message that says, “Configuration option ‘contained database authentication’ changed from 0 to 1. Run the RECONFIGURE statement to install.” after you execute the query.
Step 2 – Install JAVA JRE (Version 1.8 or higher):
This Oracle JAVA link will take you to the latest downloads for JAVA. Just pick up the JRE of the latest version. At the time of this blog post, the latest version is Java SE 9.0.1, of which I take the Windows offline version that is an .exe file. Run the application, follow the prompts, uninstall any previous versions if prompted, and we are done with this step.
Step 3 – Set JAVA_HOME environment variable:
In Windows 10 search for “environment variables” and you will see “Edit the system environment variables” as a result. Click on that and you will get the System Properties dialog box from the Control Panel. Click on the Advanced tab –> Environment Variables and in the System variables section add a NEW variable for JAVA_HOME with the value the path of where your JAVA install is located. In my case it is located here: C:\Program Files\Java\jre-9.0.1.
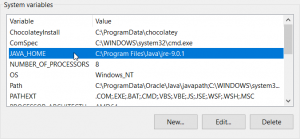
Java Home Environment System Variable
Step 4 – Install SOLR (Version 6.6.2):

If you have been using Lucene for all your Sitecore projects, the time has come to make the jump over to SOLR. Why? Sitecore expects you to use SOLR for all on-premises search functionality, and Azure Search for all cloud search functionality with Sitecore 9. Say goodbye to Lucene as the search provider moving forward! SOLR is the way to go even if you are starting development with a version 8 instance now. Start with SOLR and it will easily upgrade to 9 when the time comes to move on to Sitecore 9. So remember, no more Lucene doing 8+ Sitecore implementations, always default to SOLR for the search provider for on-premises search functionality. This is the my recommendation, and I believe the community agrees unless there is a really special case to use Lucene. Since, it is recommended to use SOLR 6.6.2, as mentioned in the George’s blog post, we will run with that version.
This SOLR Release Archive link will take you the previous versions of SOLR that we know are compatible with Sitecore 9. Sitecore 6.6.2 is the one we know is able to work with Sitecore 9 so I download the “solr-6.6.2.zip” version. Once downloaded, I simply unzip the folder to my Program Files location on my machine, which is “C:\Program Files” on Windows 10.
Step 5 – Setup SOLR to run as Windows Service
Now, that I have SOLR installed on my machine, I will want to start it as a Windows service so I don’t have to turn it on/off when I need to interact with the SOLR indexes. We want to work smarter, not harder so we will setup the Windows service using the NSSM (Non-Sucking Service Manager) to help us with this task. I will download the “prerelease build 2.2.4-101” because I am using Windows 10 and had a previous issue where the service would fail to start using other NSSM versions. You can try the latest version but if it fails to start the service, try the prerelease version I mentioned.
Once I download the .zip file, I extract it, and rename it from “nssm-2.24-101-g897c7ad” to “nssm” and cut/copy the files into the “C:\Program Files” folder. I renamed because it will make it easier to start the program, which I will show you now.
I start-up a command prompt as an Administrator, and type the following:
"C:\Program Files\nssm\win64\nssm" install solr6
This will bring up the NSSM Service Editor dialog box. In the Application tab, for the Path field I navigate to my solr script located here (C:Program Files\solr-6.6.2\bin\solr.cmd), which once selected will fill in the Startup Directory by default, which for me is (C:\Program Files\solr-6.6.2\bin). For the Arguments, I put in the following:
start -f -p 8983

Solr Service Configuration for NSSM
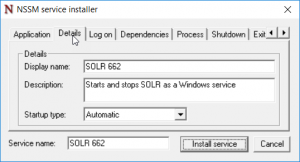
Solr Service Details for NSSM
Now, you want to start the service so in the Windows 10 search type in Component Services and click on the application. Click on Services and you will see all the services in the right hand pane. Scroll down to SOLR 662 and start the service. It should start without any issues. If you get an error stating that the service won’t start, make sure you performed the previous steps.
Now, make sure that the SOLR dashboard pulls up in your Internet browser by browsing to http://localhost:8983/solr. If the SOLR administration panel is available then you are now done with this step.
One note is if you ever decide to delete the service you can delete it using Windows Powershell. Open up Powershell as an Administrator and below is the proper code:
$service = Get-WmiObject -Class Win32_Service -Filter "Name='servicename'"
$service.delete()Step 6 – Enable SSL (Generate a Self-Signed Certificate and a Key)
Instead of doing the following below you can run a script provided by Kam Figy to automate this process. Here is the link to Quickly add SSL to SOLR. However, if you are feeling like doing the manual steps because you want to know what is going on behind the scenes then feel free to keep following directions.
Open a command prompt as an Administrator and change the directory to the Java bin folder as such:
cd "C:\Program Files\Java\jre-9.0.1\bin"
Next, put in the following code to generate a keystore file named “solr-ssl.keystore.jks” in the above directory:
keytool -genkeypair -alias solr-ssl -keyalg RSA -keysize 2048 -keypass secret -storepass secret -validity 9999 -keystore solr-ssl.keystore.jks -ext SAN=DNS:localhost,IP:127.0.0.1 -dname "CN=localhost, OU=Organizational Unit, O=Organization, L=Location, ST=State, C=Country"
Next, copy the keystore file named “solr-ssl.keystore.jks” and paste into the “server\etc” folder, which in my case is “C:\Program Files\solr-6.6.2\server\etc”.
Next, open up the “solr.in.cmd” file in the bin folder in Notepad++ and uncomment the section for setting SSL-related system properties. Below is the uncommented section:
REM Uncomment to set SSL-related system properties
REM Be sure to update the paths to the correct keystore for your environment
set SOLR_SSL_KEY_STORE=etc/solr-ssl.keystore.jks
set SOLR_SSL_KEY_STORE_PASSWORD=secret
set SOLR_SSL_KEY_STORE_TYPE=JKS
set SOLR_SSL_TRUST_STORE=etc/solr-ssl.keystore.jks
set SOLR_SSL_TRUST_STORE_PASSWORD=secret
set SOLR_SSL_TRUST_STORE_TYPE=JKS
set SOLR_SSL_NEED_CLIENT_AUTH=false
set SOLR_SSL_WANT_CLIENT_AUTH=false
Now, you will need to add the certificate as a trusted root certificate using the Microsoft Management Console. Now, you will need to convert your .jks file to a .pfx file so you can import into Trusted Root Certification Authorities store for a local computer. Here is a link to do that: https://www.stevefenton.co.uk/2012/09/convert-certificate-from-jks-format-to-pfx-format/.
Quick route instead of going to the link above is open up a command prompt as an Administrator and type in the following and that should convert your .jks to .pfx:
cd C:\Program Files\Java\jre1.8.0_162\bin
keytool -importkeystore -srckeystore "C:\solr\solr-6.6.2\server\etc\solr-ssl.keystore.jks" -srcstoretype JKS -srcstorepass secret -destkeystore "C:\solr\solr-6.6.2\server\etc\solr-ssl.keystore.pfx" -deststoretype PKCS12 -deststorepass secret
Lastly, here are directions on Adding certificates to the Trusted Root Certification Authorities store for a local computer.
Now, I check to make sure that my connection is secure when I go to https://localhost:8983/solr and Google Chrome tells me it is a “SECURE” connection to the left of the URL with a lock icon.
Secure Solr Administration
At this point I was able to follow George’s instructions on his blog post How to install Sitecore 9 with the Sitecore Install Framework (SIF), and get working instance of Sitecore 9 on my local developer machine. Keep in mind there are some post-installation steps after installing Sitecore 9 so take a look at the Installation Guide for those steps, but this should be you going in the right direction quickly. Happy coding!
Thank you Toby for this post, it is very helpful. There is only one thing: in your example the solr-ssl.keystore.jks has a keypass \”penguin\”, when in solr.in.cmd it is \”secret\”. I beleave, they should be the same.
Best Regards,
Max
You are correct. The password should be \”secret\”. Updated the blog post with that password. Thanks!
Awesome Thank You. Just followed the steps and installation guide. Finally Sitecore 9.0 installed easily with minor hiccup 🙂
Do you have any instructions for installing XP1 or an install script that I could use.I have limited experience with sitecore 9 and trying to modify the xp0 script into a XP1 script isn\’t working out.
Unfortunately, I do not have any experience with XP1 install just yet. Whatever you find out though when it is installed, please do enlighten us here. Thanks!
I could not import the generated keystore file, because it was in an old (non-pkcs12) format. To ensure the correct format is used, you can add \”-deststoretype pkcs12\” to the keytool command. If you already generated the jks file and it can not be imported, you can use this command to convert it: \”keytool -importkeystore -srckeystore solr-ssl.keystore.jks -destkeystore solr-ssl.keystore.jks -deststoretype pkcs12\”.
On step 5, the command line I had to use was actually
C:Program Filesnssmwin64> nssm.exe install solr6
(was missing the exe)
Modified the post to reflect nssm.exe. Thank you for the feedback, it helps us all out in the community!
After importing the certificate a restart of the service is needed to make it read the configuration again. Just in case this helps somebody.
Thank you for your article it’s very insightful. However, I am having an issue when I try to run the Solr service I receive a message that states the following:
“Windows could not start the SOLR 662 service on Local Computer.
The service did not return an error. This could be an internal Windows error or an internal service error.
If the problem persists, contact your system administrator.”
I can start the service manually but ideally I would like to do so.
Thank you,
Pedro
Cant browse to http://localhost:8983/solr , dashboard is not appearing.
This could be because of many different things just make sure that when you start up your service using NSSM that it is pointed to the correct solr.cmd file in the solr-6.6.2\bin folder.
You will need to use https versus http. In your case use: https://localhost:8983/solr.
2 issues which caused me some problems when using java 10 and above. Make these changes if the solr service is not starting.
1. You need to remove UseParNewGC from the solr.cmd
2. Find –> if “%%a” GEQ “9” (
Replace with –> if %%a GEQ 9 (
Hope this helps someone else as well.