The need exists for the ability to read and extract data from BICS, especially when the ETL strategy involves a Staging approach, as written about in Best Practice to ETL with Data Sync (BICS). But Data Sync does not support the direct data read from BICS. The built-in Oracle (BICS) connection in Data Sync only supports a data write to BICS. In order to fill in such a gap, the Apex’s RESTful Services feature can be leveraged to export data from BICS schema service to csv file, which can then be consumed by Data Sync mappings.
The solution, in a nutshell:
- Create Apex’s RESTful Web Services.
- Create cURL scripts to consume RESTful Web Services.
- Create Data Sync mappings.
- Create Data Sync file trigger for load automation.
cURL is a free command line tool widely used for testing Web Services, and available with most OS installs but Windows. A Windows version binary can also be downloaded from the Internet.
1. Create Apex’s RESTful Web Services
Login to Oracle Application Express (Apex) for BICS schema service, go to SQL Workshop -> RESTful Services. Use the BICS’s EMP demo table as an example to:
- create a new RESTful Service module named bics.data using URI Prefix: ds/
- create a new URI Template emp-csv/
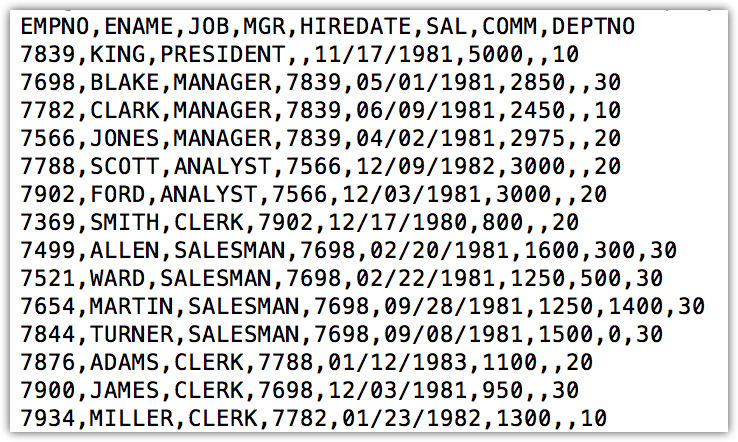
- create a new Resource Handler using Method: GET, Source Type: Query, Format: CSV, Requires Secure Access: Yes, and Source as following
select
 'EMPNO' as EMPNO, 'ENAME' as ENAME, 'JOB' as JOB, 'MGR' as MGR,
 'HIREDATE' as HIREDATE, 'SAL' as SAL, 'COMM' as COMM, 'DEPTNO' as DEPTNO
from DUAL

UNION ALL

select
 to_char(EMPNO),ENAME,JOB,to_char(MGR),to_char(HIREDATE, 'MM/dd/yyyy'),
 to_char(SAL),to_char(COMM),to_char(DEPTNO)
from EMP

2. Create cURL scripts to consume RESTful Web Services
For Data Sync installed on Windows, download the latest cURL binary for Windows. The created cURL script will perform these two tasks.
- Run cURL to consume Apex’s RESTful Web Services and download the csv file
- Create a signal file for Data Sync file trigger to perform load automation
Script sample for Windows
@echo off

# set the cURL path
set PATH=<cURL-path>;%PATH%

# run cURL to consume Apex's RESTful Web Services
curl.exe -u "bics.user@mybics.com:Welcome!" ^
-k "https://bicsdb.db.us2.oraclecloudapps.com/apex/ds/emp-csv/" ^
-o ./employees.csv

# create the signal file
echo > ./Employees_CompleteSignal.txt

@echo on
Script sample for Linux or alike
#!/bin/bash

# run cURL to consume Apex's RESTful Web Services
curl -u 'bics.user@mybics.com:Welcome1' \
-k 'https://bicsdb.db.us2.oraclecloudapps.com/apex/ds/emp-csv/' \
-o ./employees.csv

# create the signal file
touch ./Employees_CompleteSignal.txt

Guide to Oracle Cloud: 5 Steps to Ensure a Successful Move to the Cloud
Explore key considerations, integrating the cloud with legacy applications and challenges of current cloud implementations.
The script will produce two files upon successful execution.
- Employees_CompleteSignal.txt

- employees.csv
3. Create Data Sync mappings
Open Data Sync UI, create a new separate Data Sync project, let’s call it BICS_DATA_EXTRACT (a default Job BICS_DATA_EXTRACT-Job1 will be created as well when creating a new project); then create a new file data mapping that will load the employees.csv flat file.

Creating the data mapping in its own separate Data Sync project is necessary for the Data Sync file trigger to work on the given job without impacting any existing Data Sync projects, jobs and data mappings.
4. Create Data Sync file trigger for load automation
Go to <Data-Sync-Install-Home>/config-shared folder, modify the on_demand_job.xml file to set up a file trigger on the signal file Employees_CompleteSignal.txt to automatically trigger the data mapping load.
<OnDemandMonitors pollingIntervalInMinutes="5">
    <TriggerFile job="BICS_DATA_EXTRACT-Job1" file="Employees_CompleteSignal.txt">
        <TimeWindow startTime="23:00" endTime="02:30"/>
    </TriggerFile>
</OnDemandMonitors>
Assuming that there is a daily scheduled job to run the cURL shell (or command) script at 1 am, the TimeWindow setting will enable the signal file check every five minutes between 11 pm and 2:30 am every night.
After restarting the Data Sync server, the file trigger will start listening for the signal file. As soon as the signal file comes to existence, the configured will automatically start to run the configured data mapping job, and then delete the signal file.
For Incremental
Parameters can be passed in through the URI Template for incremental load. A new URI Template should be created as
emp-csv/{lrdt}
{lrdt} is the parameter for Last Run Date in format of MM-dd-yyyy, and will be automatically visible to the Resource Handler Source.
select
 'EMPNO' as EMPNO, 'ENAME' as ENAME, 'JOB' as JOB, 'MGR' as MGR,
 'HIREDATE' as HIREDATE, 'SAL' as SAL, 'COMM' as COMM, 'DEPTNO' as DEPTNO
from DUAL

UNION ALL

select
 to_char(EMPNO),ENAME,JOB,to_char(MGR),to_char(HIREDATE, 'MM/dd/yyyy'),
 to_char(SAL),to_char(COMM),to_char(DEPTNO)
from EMP
where HIREDATE >= to_date(:lrdt,'MM-dd-yyyy')

The last modified date of the last csv data file can be used for the {lrdt} parameter in the shell (or command) script. If no csv file is found, it should pass in 01-01-1900 for the parameter, and the handler will treat it as a Full load and select all data.
Previous << Best Practice to ETL … | … >> Next