The sample site that comes out of the box with Sitecore is still running on XSLT renderings and Web Forms sublayouts. Maybe you just finished the Sitecore Developers eLearning Course and want to play with Sitecore and MVC some more, or you’re starting your first Sitecore project and want something to do on the side. Either way, converting the built-in Sitecore sample site to MVC is a good exercise for new Sitecore developers.
Install Sitecore
The first step is to install Sitecore. I prefer to use Sitecore Instance Manager (SIM), but the installers on dev.sitecore.net work great too.
For this tutorial I’ll be using Sitecore 8.2 Update-2, but these steps apply for all versions from Sitecore 8.0 up. Throughout the tutorial I’ll be assuming you called your Sitecore instance SampleMvc and set the hostname to samplemvc.localhost.
Create Visual Studio Solution
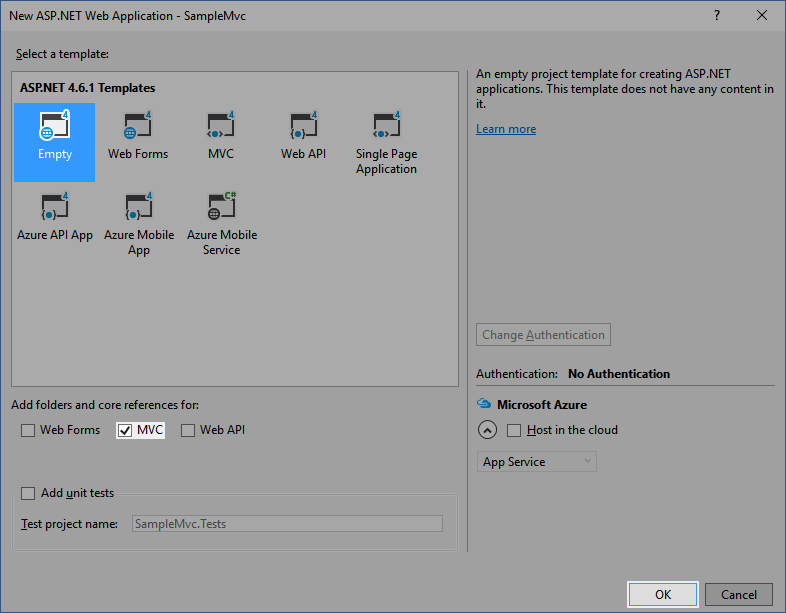
Create a new ASP.NET Web Application in Visual Studio as I’ve done below. Target .NET Framework 4.6.1.

Create an Empty project and select to add folders and core references for MVC.
Project Clean Up
Delete the following files/folders in your project:
App_DataApp_StartGlobal.asax
Sitecore comes with a Global.asax and it’s considered best practice not to change it, so delete it. The code in App_Start is not needed.
Open the Properties for the following files and set Build Action to None:
Viewsweb.configWeb.config
Sitecore comes with a Web.config and it’s considered best practice never to modify it directly. Visual Studio needs a web.config file for Intellisense to work properly, so we’ll leave it in the project but instruct Visual Studio not to copy it to the output folder on build/publish.

Create Publish Profile
To deploy your Sample MVC code to Sitecore you need a publish profile. Right click on your Visual Studio project and click Publish.... Select Custom for Select a publish target and enter a profile name. I typically name my publish profiles after their project, so I put SampleMvc.

For the Publish method select File System. Click ... next to the Target location.

Click Local IIS in the Target Location box and select your Sitecore instance under IIS Sites. Click Open and then click Next.

On the final screen select Debug as the Configuration. Click Close and click Yes to save your publish profile.

Add Sitecore NuGet References
We will need to reference a few Sitecore dlls in this project. Instead of copying those dlls from the Sitecore installation into the project, we’ll get them from NuGet.
Add Sitecore NuGet Source
To get Sitecore NuGet packages you have to add the Sitecore NuGet feed as a source in Visual Studio. In Visual Studio click Tools in the menu bar and click Options. In the Options window search for NuGet and click Package Sources. Add a new package source as I’ve done below.
Name: SitecoreSource: https://sitecore.myget.org/F/sc-packages/api/v3/index.json

You can read more about the Sitecore NuGet feeds on the Sitecore Documentation.
Add References to Project
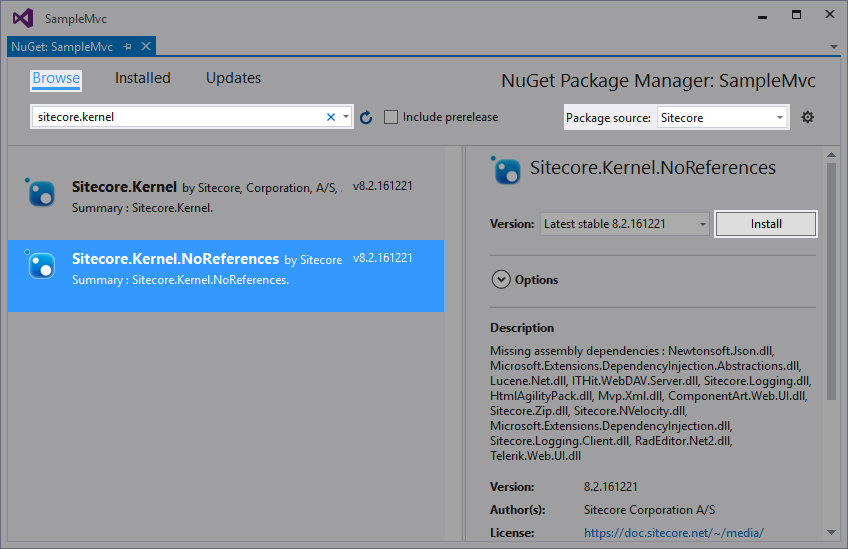
Right click on the SampleMvc project in Visual Studio and click Manage NuGet Packages.... Select Sitecore as the Package source in the top right corner. Click the Browse tab and install the following three NuGet packages:
Sitecore.Kernel.NoReferencesSitecore.Mvc.NoReferencesSitecore.Mvc.Analytics.NoReferences
Convert the Layout
Create the MVC Layout
Log in to the Sitecore backend at http://samplemvc.localhost/sitecore and open up the Content Editor.
Expand the Layout node, click on Layouts, and click the MVC Layout button. Name the layout Sample MVC Layout and click Next. Click Next again to create the layout under Layouts. Click Create to create the Sample Layout file under /Website/Views/Shared.

Switch back over to your solution and create a folder called Shared under Views. Right click on the folder and click Open Folder in File Explorer. Now navigate to the web root for your Sitecore install (e.g., C:inetpubwwwrootSampleMvcWebsite) and grab the layout you just created from ViewsShared. Copy it into the solution folder you opened.
In Visual Studio click the Show All Files icon at the top of Solution Explorer. Right click on Sample MVC Layout.cshtml and click Include in Project. Click Show All Files at the top of Solution Explorer again to hide the detritus.

Convert the Sample Layout to MVC
Navigate back to the web root for your Sitecore install (e.g., C:inetpubwwwrootSampleMvcWebsite) and open layoutsSample layout.aspx in your favorite text editor. This is the Web Forms layout referenced by the Sample Layout that comes with Sitecore out of the box. Copy and paste the contents into Sample MVC Layout.cshtml in your solution. You can safely delete this file out of your web root now.
Delete the page directives at the top of the layout. Page directives are not used by Razor.
<%@ Page Language="c#" Inherits="System.Web.UI.Page" CodePage="65001" %>
<%@ OutputCache Location="None" VaryByParam="none" %>
In place of the page directives, add the following lines:
@using Sitecore.Mvc
@using Sitecore.Mvc.Analytics.Extensions
Now delete the <sc:VisitorIdentification runat='server' /> tag at the end of the <head> tag. Replace it with @Html.Sitecore().VisitorIdentification(). Instead of user controls, Sitecore MVC uses HTML helpers accessed from the @Html.Sitecore() function to output HTML in views.
Since we’re not using Web Forms anymore, the site doesn’t need to be wrapped in a <form> tag. Move the <div id="MainPanel"> block out of the <form> block, directly under <body>.
<body>
    <div id="MainPanel">
        <sc:placeholder key="main" runat="server" />
    </div>
</body>
Now replace the <sc:placeholder> control with the HTML helper equivalent:
@Html.Sitecore().Placeholder("main")
That’s all there is to it. When you’re done your Sample MVC Layout.cshtml should look like this:
@using Sitecore.Mvc
@using Sitecore.Mvc.Analytics.Extensions
<!DOCTYPE html>
<html lang="en" xmlns="http://www.w3.org/1999/xhtml">
<head runat="server">
  <title>Welcome to Sitecore</title>
  <meta http-equiv="X-UA-Compatible" content="IE=edge">
  <meta http-equiv="Content-Type" content="text/html; charset=UTF-8" />
  <meta name="CODE_LANGUAGE" content="C#" />
  <meta name="vs_defaultClientScript" content="JavaScript" />
  <meta name="vs_targetSchema" content="http://schemas.microsoft.com/intellisense/ie5" />
  <link href="https://fonts.googleapis.com/css?family=Open+Sans:400,300italic,400italic,600italic,700italic,300,600,700,800" rel="stylesheet" type="text/css" />
  <link href="/default.css" rel="stylesheet" />
  @Html.Sitecore().VisitorIdentification()
</head>
<body>
  <div id="MainPanel">
    @Html.Sitecore().Placeholder("main")
  </div>
</body>
</html>
Use the MVC Layout
Switch back over to the Content Editor. Right click on the original Sample Layout item under sitecoreLayoutLayouts and click Delete. You’ll get a notice about breaking links. This is good–Sitecore sees that other items reference this layout and doesn’t want you to break the site.

Click Link to another item and click Continue. Navigate to the Sample MVC Layout you created and click Continue. Sitecore will update all items that referenced Sample Layout and point them to Sample MVC Layout instead.

All done with the layout!
Convert the Sublayouts to Renderings
Out of the box Sitecore has 3 sample sublayouts: Sample Datasource Sublayout, Sample Inner Sublayout, and Sample Sublayout; and one XSLT rendering: Sample Rendering. These can be found under /sitecore/layout/Sublayouts and /sitecore/layout/Renderings/Sample.
The Sitecore sample site only uses the Sample Inner Sublayout sublayout, the Sample Sublayout sublayout, and the Sample Rendering XSLT rendering. In this section we will convert these into MVC controller and view renderings. I will cover the purpose and conversion of the Sample Datasource Sublayout in a follow-up post.
Convert Sample Sublayout to View Rendering

Sitecore has two types of renderings for MVC components: controller renderings and view renderings. Holy wars have been fought (and are still being fought) in the Sitecore community about which is better. As a general rule of thumb, go with a controller rendering for components that have business logic; otherwise, go with a view rendering.
Sample Sublayout has no business logic so we will convert it into a view rendering.
Create the Sample MVC Sublayout View Rendering
In the Content Editor, expand the Layout node, expand Renderings, right click the Sample folder, and click Insert from template.
In the Insert from Template dialog, drill down to TemplatesSystemLayoutRenderings and select View rendering. Name the item Sample MVC Sublayout and click Insert.

Exercise diligence and select an icon for your new rendering. For consistency I’ve chosen the same icon as Sample Sublayout: Business/32x32/column.png.
On your rendering, set the following fields:
Path: /Views/Sample/SampleMvcSublayout.cshtmlPlaceholder: content
The Path value will be illuminated in the next section. I copied the Placeholder value from the Sample Sublayout sublayout.
Create the Sample MVC Sublayout View
Switch over to your solution in Visual Studio. Under the Views folder, create a folder called Sample. Create a view in the Sample folder called SampleMvcSublayout.

Navigate back to the web root for your Sitecore install (e.g., C:inetpubwwwrootSampleMvcWebsite) and open layoutsSample Sublayout.ascx in your favorite text editor. This is the Web Forms control referenced by the Sample Sublayout that comes with Sitecore out of the box. Copy and paste the contents into SampleMvcSublayout.cshtml in your solution. You can safely delete this file out of your web root now.
Delete the control directive at the top of the view.
<%@ Control Language="c#" AutoEventWireup="true" TargetSchema="http://schemas.microsoft.com/intellisense/ie5" %>
In place of the page directive, add the following line:
@using Sitecore.Mvc
Replace the <sc:placeholder> control with the HTML helper equivalent:
@Html.Sitecore().Placeholder("centercolumn")
When you’re done your SampleMvcSublayout.cshtml should look like this:
@using Sitecore.Mvc
<div id="CenterColumn">
  @Html.Sitecore().Placeholder("centercolumn")
</div>
Use the Sample MVC Sublayout Rendering
Switch back over to the Content Editor. Right click on the original Sample Sublayout item under /sitecore/layout/Sublayouts and click Delete. When you get the Broken Links dialog, select Link to another item, and select the Sample MVC Sublayout rendering created above.
Convert Sample Inner Sublayout to Controller Rendering
Sample Inner Sublayout has some business logic, so we will convert it into a controller rendering instead of a view rendering.
Create the Sample MVC Inner Sublayout Controller Rendering
In the Content Editor, expand the Layout node, expand Renderings, right click the Sample folder, and click Insert from template.
In the Insert from Template dialog, drill down to TemplatesSystemLayoutRenderings and select Controller rendering. Name the item Sample MVC Inner Sublayout and click Insert.

Exercise diligence and select an icon for your new rendering. For consistency I’ve chosen the same icon as Sample Inner Sublayout: Business/32x32/row.png.
On your rendering, set the following fields:
Controller: SampleController Action: SampleMvcInnerSublayoutPlaceholder: content
The Controller and Action values will be illuminated in the next section. I copied the Placeholder value from the Sample Inner Sublayout sublayout.
Create the Sample MVC Inner Sublayout Controller and Model
Switch over to your solution in Visual Studio. Under the Models folder, create a new class called SampleMvcInnerSublayoutViewModel. Give it a single int property called CurrentYear like so:
namespace SampleMvc.Models
{
  public class SampleMvcInnerSublayoutViewModel
  {
    public int CurrentYear { get; set; }
  }
}
Under the Controllers folder, create a new controller called SampleController. Give it a single action method called SampleMvcInnerSublayout like so:
using System;
using System.Web.Mvc;
using SampleMvc.Models;
namespace SampleMvc.Controllers
{
  public class SampleController : Controller
  {
    public ActionResult SampleMvcInnerSublayout()
    {
      var model = new SampleMvcInnerSublayoutViewModel
      {
        CurrentYear = Sitecore.DateUtil.ToServerTime(DateTime.UtcNow).Year
      };
      return View(model);
    }
  }
}
For the purposes of this tutorial, the Sitecore.DateUtil.ToServerTime(DateTime.UtcNow).Year code is considered the “business logic”. Frankly, there’s no problem with you putting this code directly into the view and skipping the controller rendering altogether. I’m just using this an exercise to introduce you to controller renderings.
In the previous section, we specified the Controller field as Sample and the Action field as SampleMvcInnerSublayout on the controller rendering. Those fields map to the name of the controller and action method created here.
Create the Sample MVC Inner Sublayout View
Under the Views folder, open the Sample folder created previously and create a view called SampleMvcInnerSublayout.
Navigate back to the web root for your Sitecore install (e.g., C:inetpubwwwrootSampleMvcWebsite) and open layoutsSample Inner Sublayout.ascx in your favorite text editor. This is the Web Forms control referenced by the Sample Inner Sublayout that comes with Sitecore out of the box. Copy and paste the contents into SampleMvcInnerSublayout.cshtml in your solution. You can safely delete this file out of your web root now.
Delete the control directive at the top of the view.
<%@ Control Language="c#" AutoEventWireup="true" TargetSchema="http://schemas.microsoft.com/intellisense/ie5" %>
In place of the control directive add the following two lines:
@using Sitecore.Mvc
@model SampleMvc.Models.SampleMvcInnerSublayoutViewModel
Replace the <sc:placeholder> control with the HTML helper equivalent:
@Html.Sitecore().Placeholder("content")
Replace the code render block <%= %> with a reference to the CurrentYear property on the Model:
<div id="Footer"><hr class="divider" />© @Model.CurrentYear Sitecore</div>
When you’re done your SampleMvcInnerSublayout.cshtml should look like this:
@using Sitecore.Mvc
@model SampleMvc.Models.SampleMvcInnerSublayoutViewModel
<div id="InnerCenter">
<div id="Header">
<img src="-/media/Default Website/sc_logo.ashx" alt="Sitecore" id="scLogo" />
</div>
<div id="Content">
<div id="LeftContent">
@Html.Sitecore().Placeholder("content")
</div>
</div>
<div id="Footer"><hr class="divider" />© @Model.CurrentYear Sitecore</div>
</div>
Use the Sample MVC Inner Sublayout Rendering
Switch back over to the Content Editor. Right click on the original Sample Inner Sublayout item under /sitecore/layout/Sublayouts and click Delete. When you get the Broken Links dialog, select Link to another item, and select the Sample MVC Inner Sublayout rendering created above.
Convert Sample Rendering to View Rendering
The final rendering we have to convert is the XSLT rendering, Sample Rendering. No holy wars have been fought in the Sitecore community about whether or not you should use XSLT renderings–you shouldn’t.
The Sample Rendering has no business logic so we will convert it into a view rendering.
Create the Sample MVC Rendering View Rendering
In the Content Editor, expand the Layout node, expand Renderings, right click the Sample folder, and click Insert from template.
In the Insert from Template dialog, drill down to TemplatesSystemLayoutRenderings and select View rendering. Name the item Sample MVC Rendering and click Insert.

Exercise diligence and select an icon for your new rendering. For consistency I’ve chosen the same icon as Sample Rendering: Applications/32x32/text_align_left.png.
On your rendering, set the following fields:
Path: /Views/Sample/SampleMvcRendering.cshtmlPlaceholder: content
The Path value will be illuminated in the next section. I copied the Placeholder value from the Sample Rendering XSLT rendering.
Create the Sample MVC Sublayout View
Under the Views folder, open the Sample folder created previously and create a view called SampleMvcRendering.

Navigate back to the web root for your Sitecore install (e.g., C:inetpubwwwrootSampleMvcWebsite) and open xslsample rendering.xslt in your favorite text editor. This is the XSLT file used by the Sample Rendering that comes with Sitecore out of the box. Copy and paste the contents inside the <xsl:template match="*" /> node into SampleMvcRendering.cshtml in your solution. You can safely delete this file out of your web root now.
Add the following line to the top of your view:
@using Sitecore.Mvc
Replace the <sc:text> controls with the HTML helper equivalent:
@Html.Sitecore().Field("title")
@Html.Sitecore().Field("text")
When you’re done your SampleMvcRendering.cshtml should look like this:
@using Sitecore.Mvc
<div>
  <h1 class="contentTitle">
    @Html.Sitecore().Field("title")
  </h1>
  <div class="contentDescription">
    @Html.Sitecore().Field("text")
  </div>
</div>
Use the Sample MVC Sublayout Rendering
Switch back over to the Content Editor. Right click on the original Sample Rendering item under /sitecore/layout/Renderings/Sample and click Delete. When you get the Broken Links dialog, select Link to another item, and select the Sample MVC Rendering rendering created above.
Publish Everything
Now we just need to publish the code to your Sitecore install and publish all the changes within Sitecore to the web database.
Publish Code
At last the publishing profile we set up in the beginning of this post will come to use. Right click on the SampleMvc project in Visual Studio and click Publish.... On the dialog that pops up click the Publish button. This deploys all your code and views to your Sitecore install.

Publish Sitecore Items
Open up the Content Editor in Sitecore and on the Publish tab click the Publish dropdown and Publish site. Select Smart publish.
Now if you navigate to your site at http://samplemvc.localhost you should see the sample page load. It doesn’t look any different than before, but now it’s running entirely on MVC.
Summary
You can find all of the code for this blog post on GitHub in my Sitecore.SampleMvc repository.
If you don’t want the code and just want the sample site to run on MVC, you can download the Sitecore package from Releases and install that straight into your Sitecore instance.
Did this help you out? Let me know your thoughts in the comments.
Nice post! Thanks
Thank you! Glad you enjoyed it.
Great minds…..
https://github.com/SaintSkeeta/Sample-Default-Sitecore-MVC
It\’s been a while since I updated my repo though…. I\’ll get around to that soon.
Very nice post and detailed enough to follow the steps. I like the idea to use NuGet package for the reference instead of copy them or reference them
some of the images are throwing 404. Could you please make them available?