
Are you currently thinking about migrating your existing on-premises Hyperion Planning application to the Cloud? Are you having reservations about what this process may entail? Well put your reservations aside! Oracle Planning and Budgeting Cloud Service (PBCS) makes the migration easy as it essentially has the same code base as on-premises Hyperion Planning release 11.1.2.3. In this blog I will give a brief introduction to the basic steps of using the PBCS Application Management (LCM) to migrate an on-premises Planning application to the Oracle Planning and Budgeting Cloud Service.

Guide to Oracle Cloud: 5 Steps to Ensure a Successful Move to the Cloud
Explore key considerations, integrating the cloud with legacy applications and challenges of current cloud implementations.
Prerequisites:
- The first release of PBCS supports an upgrade path from R 11.1.2.1 directly into a Cloud based application. The immediate roadmap includes adding support for upgrades from R 11.1.2.2 and then R 11.1.2.3 to PBCS.
- Ensure that the current on-premises Planning application is stable and without any cube refresh errors or invalid rules.
- The Service Administrator role is required in PBCS in order to perform the migration.
- The LCM Administrator role and Administrator role are required in the on-premises EPM system.
- The target application name in PBCS should be same as the on-premises application name.
- Ensure that no application currently exists in PBCS.
Artifacts Not Supported:
- Shared Service custom roles
- Reporting and Analysis Annotation and Batch Jobs
- Essbase global substitution variables. Global substitution variables have to be converted into application-specific variables before migration
- Workspace Pages and Personal Pages
- Essbase report scripts and rules (rul.) files
Migration Steps:
- Migrate the Security Model:
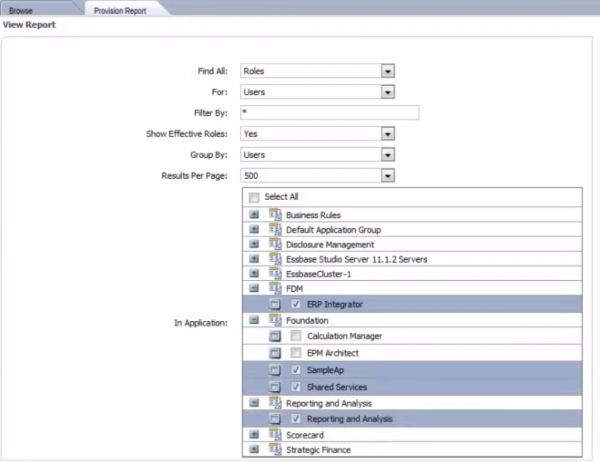
- Identify on-premises EPM System users and groups. Generate a provisioning report that contains the information of users and groups provisioned for the on-premises Planning application that is being migrated.
- Use the provisioning report to identify users who should be allowed access to the service. Use the text editor to create a comma-separated user upload file, users.csv, with the following format:

- Log into the on-premises Planning application Shared Services as the Administrator and export the Native Directory as groups.csv.
- Use a text editor to open the groups.csv file and delete information for groups that are not used to control access to Foundation Services, Planning, Enterprise Resource Planning Integrator, and Reporting and Analysis artifacts.
- Add information pertaining to the external groups that are used to grant access to Oracle Hyperion Foundation Services, Planning, Enterprise Resource Planning Integrator, and Reporting and Analysis artifacts.
- Use a text editor to create comma-separated files for those users being assigned to each PBCS role: viewers.csv, planners.csv, powerusers.csv, admins.csv.
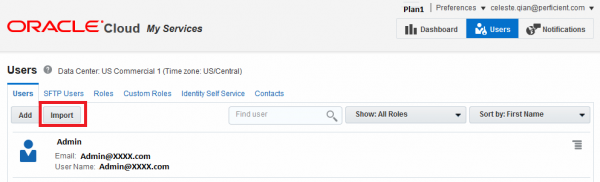
- Log into Oracle Cloud My Services and import the following files: users.csv, viewers.csv, planners.csv, powerusers.csv and admins.csv.

- Log into Oracle Planning and Budgeting Cloud Service Application Management to import the groups.csv file.

- Identify on-premises EPM System users and groups. Generate a provisioning report that contains the information of users and groups provisioned for the on-premises Planning application that is being migrated.


- Export Artifacts from the On-Premise Deployment
- Launch the Shared Service Console in the on-premises deployment and export the following artifacts:
- Foundation – Calculation Manager
- Planning – Planning application except Global Artifacts – Report Mappings

- Reporting and Analysis – Repository Objects:
- All Financial Reporting objects associated with the Planning application (Snapshot Report and Snapshot Book do not need to be associated with an application)
- Any third-party content
- HRInternal – DataSources
- UserPOVs for the user that were migrated as part of the security model migration in HRInternal – UserPOV
- Security
- Define the migration and specify the folders to the data set. Clear Export with the Job Output export option and execute the migration.NOTE: The PBCS File Transfer Utility supports migrating artifacts between an on-premises environment and a PBCS environment without using the browser.
- Launch the Shared Service Console in the on-premises deployment and export the following artifacts:
- Export Data (Optional)
- Export data from the EAS console as needed (R 11.1.2.1.x). Use administration services to perform the export.
- Zip the Exported Artifacts and Upload the Zip Files to the Planning and Budgeting Cloud Service Workspace
- Navigate to middleware_home/user_projects/epmsystem1/import_export/admin@native directory on the Foundation Service machine in the on-premised deployment.
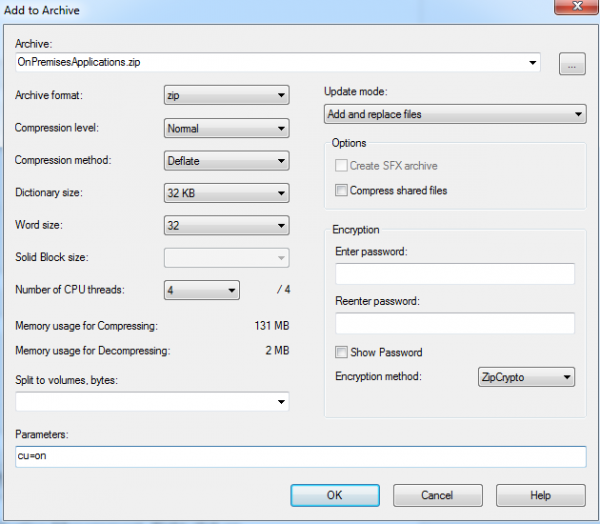
- Right-click the export folder and select your zip file equivalent and then select Add to Archive.
- In the Add to Archive dialog box, right-click the selected folders and set the following information:
- Change the name of the archive to OnPremisesApplications.
- In the Archive Format field, select Zip.
- In the Parameters field, enter cu=on.
- Log into PBCS and navigate to Administer, and then Application Management. Right-click on Application Snapshots and select Upload. Browse to the folder containing the zip file and click Finish.

- Import Artifacts to Oracle Planning and Budgeting Cloud Service:
- In PBCS, navigate to Administer, then Application and expand Application Snapshots.
- Import all products and artifacts in the following order: Reporting and Analysis, Planning, Calculation Manager.
- If the Migration Status Report shows an error that the Exchange Rate artifacts failed to import, re-import Global Artifacts – Exchange Rate.
- Manually Migrate Essbase Data to Oracle Planning and Budgeting Cloud Service (R 11.1.2.1.x)
- Manually Define Business Rules Security if the Calculation Manager Module was used in release 11.1.2.1.x:
- Start the Administration Service Console and expand Business Rules, then Repository View, and then Rules.
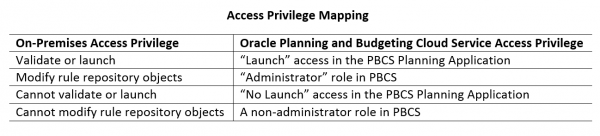
- Use the following table to map the access privilege for each business rule.
- Log into PBCS and navigate to Administration, then Manage, and then Business Rule Security.
- Select each business rule that was migrated and manually assign its user/group privileges.
- Check the Migration Status Reports and Validate the Application.


