
In my previous posting Setting Up a Sitecore Solution – Part 1 Visual Studio and Projects, we covered the basics of setting up your development instance to work on a Sitecore project, and we defined an empty “shell” of a solution in Visual Studio.
To review, here’s our empty shell of a solution:

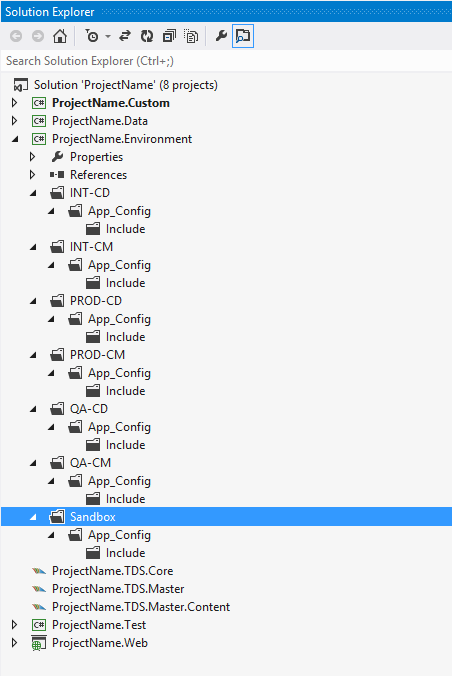
As you see, we have 3 TDS projects in the solution. One for the master database items, one for core database items, and another we’ll use to store some “content items” that are used by the developers to “prime” their local sandbox instance for work.
What is TDS Used For?
If you remember, some our design goals for our solution configuration included (1) allowing devs to setup their source code on their machines in whatever directory / drive they choose, (2) we want solutions that are easily deployable to various environments, (3) making your local Sitecore instance replaceable if something goes wrong and (4) support having multiple branches of a project running on the same machine.
Some teams choose to install Sitecore to their local machines and work directly in the website – for many reasons, this is a bad idea. It is important to always isolate your assets from the Sitecore product itself. So our code will not be intermixed with Sitecore files – our files are our files, and we shouldn’t include anything that we don’t own in our Visual Studio solution.
TDS has 3 important functions we’ll discuss.
- TDS will store your Sitecore items for code control
- TDS will deploy your work to your local sandbox instance
- TDS can package your work, including Sitecore items to be installed on other environments
Installing your Sitecore Sandbox Instance
Before we get started, we need to have a running installation of Sitecore on our development system.
Once again, many teams choose to do this differently, such as installing a central database instance that all developers can use collaboratively. And, once again, we think this is a bad idea for lots of reasons. Instead, we choose to have each developer install their own local running Sitecore instance.
Where we install this Sitecore instance is particularly important. For our example solution, let’s say our solution folder is C:TEMPPROJECTNAME – here’s what it looks like:

Create a folder in the solution folder called “sandbox”, and use the Sitecore installer to install a fresh instance of Sitecore on your machine.
This part should be easy, because we want to be able to reinstall the Sitecore instance easily, and it shouldn’t be too tough to setup new developers to work on the solution. It’s important that this “sandbox” folder is within the folder structure of your project – don’t worry – we’ll make sure this doesn’t get checked into code control in a bit.
We won’t go into how to use the Sitecore installer, but in this case we’ll assume you’ve used the URL http://myproject for your local Sitecore instance for this project.
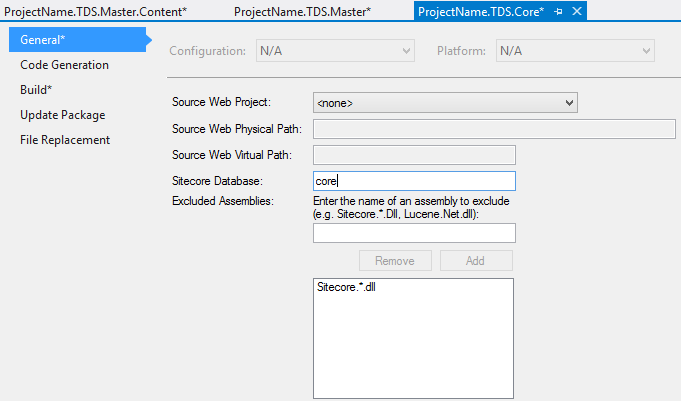
Basic TDS Configuration (Database, GUID, URL, Linking Web Project, Libs / References)
We’ll start out by setting up TDS “basics”. Each project will need the following – a URL to access the local sandbox instance, and a Sitecore Access Guid.
Before we start, we will define the build configuration we want to use for our local sandbox. You might choose to use debug, we typically create a copy of Debug called “Sandbox”.

Now, that you have a build configuration for the sandbox instance, let’s connect each TDS project to the local Sitecore instance. Once you have selected Sandbox as your build configuration, open the properties of each TDS project and set the following values:
General Tab – set the database
Build Tab – set the Sitecore Web URL and Sitecore Deploy folder. Note that the Sitecore Deploy Folder is set as a relative directory path. This will ensure that the setup works regardless of where each developer works from on their local machine.
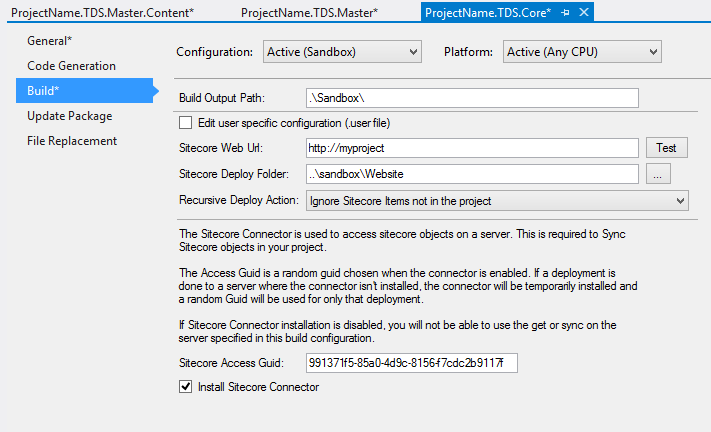

On this same build tab, select the checkbox option to “Install Sitecore Connector”. Copy the Sitecore Access Guid from the first project you setup, and copy this value into the other TDS projects. Make sure all projects are using the same Sitecore Access Guid.
Connecting the ProjectName.TDS.Master Project to ProjectName.Web
For the ProjectName.TDS.Master project ONLY, return to the Build tab and select ProjectName.Web in the pulldown for Source Web Project.

Connecting these 2 together will create a dependency between ProjectName.TDS.Master and ProjectName.Web, and make it so that when you build the ProjectName.TDS.Master (or the solution), the resulting build of ProjectName.Web is “copied” into your local instance (and build packages for other configurations which we’ll setup later).
Warning: Make sure you remove the web.config file from your ProjectName.Web project at this point, otherwise TDS will copy this file into your Sitecore instance and you don’t want that.
Setting Up Sitecore References
Undoubtedly, your projects will require references to several Sitecore assemblies. Although this list is not complete, here are the assemblies that we typically reference in our solutions:
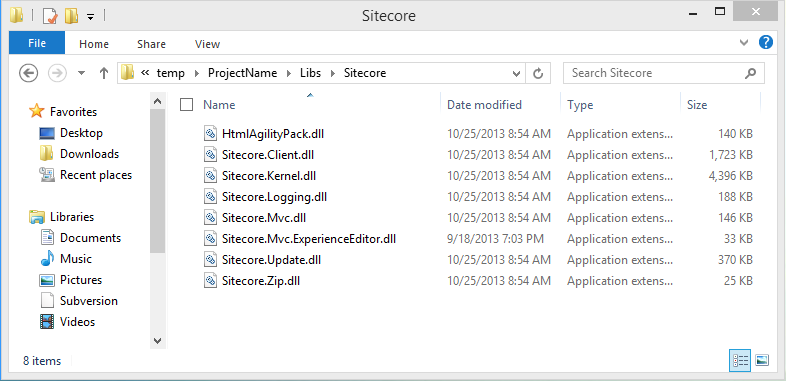
Create a folder called LibsSitecore in your solution folder, and copy these assemblies from the sandboxWebsitebin folder of your running Sitecore sandbox instance.
Excluding the Reference from the Build
When you add these references, Visual Studio will “copy” them into the bin folder of your ProjectName.Web project when built. You can use the CopyLocal=false to prohibit this behaviour, but in some cases I get build errors when using this approach.
To make sure that TDS doesn’t copy these Sitecore assemblies back into the local sandbox instance, you can tell TDS to ignore these files.

Note: TDS by default adds in a global ignore of Sitecore.*, I usually don’t use this because if I add any patch files from Sitecore into the solution, this will prohibit them from being packaged and deployed.
Defining Other Build Configurations
Next, you’ll want to define your other build configurations. Each team has their own practices, test environments and requirements to consider here. Let’s assume we are working with an enterprise level client, and we have 3 environments to consider – INT, QA, and PROD – and each environment has separate Content Management and Content Delivery servers. In this case, we’ll define 6 build configurations in addition to the Sandbox configuration we’ve already created. We’ll leave it as a separate exercise to know how each project will be setup in terms of build settings, but note this – when running Sitecore in production do NOT build your assemblies with Debug information in them.
So we’ll define the following:
INT-CM
INT-CD
QA-CM
QA-CD
PROD-CM
PROD-CD
Once again, you might choose to do this differently, this is our approach. If using continuous integration, you might also choose to create configurations for that environment as well.
Why Separate CM and CD into Different Configurations?
You might ask why separate the CM and CD environments at all. Well, in some cases you can create a configuration that will be the same for these 2 environments, but in many cases there are configuration elements – such event handlers and pipeline processors (for example) that will be different for each target environment.
TDS Build Settings
These build configurations will have different settings in TDS. Instead of allowing TDS to deploy directly to these other environments, we choose to “package” the build for these environments.
Step 1 – Set the Build and Deploy Settings in Configuration Manager. Note that the “deploy” checkbox is not selected, and that the “build” checkbox is not selected for the ProjectName.TDS.Master.Content project. Do this for all of the 6 new build configurations.

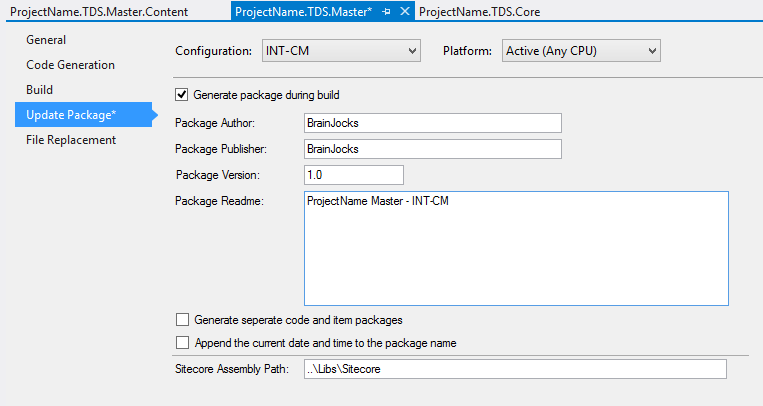
Step 2 – for the ProjectName.TDS.Core and ProjectName.TDS.Master (NOT the ProjectName.TDS.Master.Content), setup the option to build a Sitecore Update Package.
For each of the 6 new build profiles, for these 2 projects, setup the following settings:
Small Change for the CD Build Configurations
Once you have done this for all 6 of the build configurations, you’ll make a small change to the 3 Content Delivery (CD) build configurations.

Note the selection of the option Generate Separate code and item packages – since content items are published from CM to CD server, the CD server packages do not need them in the update package. This will cause TDS to create 2 files – files and items – you can ignore the items package for these servers and only use the files package.
Setting Up File Replacements
The last big step is to define the TDS file replacements. Remember that what TDS does is build the web project and copy the resulting build either into an update package or into our running sandbox instance of Sitecore. So, if we are following best practices and implementing Sitecore patch files (this is a really good idea), we could add these patch files into the Sitecore configuration by creating an App_ConfigInclude folder within our ProjectName.Web project.
However, the configuration will be different for each target environment and server type.
Now we can use the ProjectName.Environment project in our Visual Studio solution.
In Visual Studio – create a folder in the ProjectName.Environment project for each build environment – including our Sandbox build configuration, and in each of those folders, create an App_ConfigInclude folder.
ONLY the ProjectName.TDS.Master project, add in the following entry to each build configuration matching the folder name to the build configuration.

This will allow TDS to copy any patched or overridden configuration files you place in ProjectName.EnvironmentSandbox into the root of your Sitecore instance. Doing the same in the other build configurations will copy those files onto the target server when installing the update installation package.
Excluding Stuff from Code Control
Finally, we can exclude things we don’t want checked in to source control. TDS creates lots of temporary folders and files during its build process that we simply don’t need. Rather than go into a lengthy explanation – this blog post is already ridiculous, here’s my .gitignore file contents from another project:
BuiltFiles_*.txt
*.TDS.*/Package_*/
*.TDS.*/QA-*/
*.TDS.*/INT-*/
*.TDS.*/Debug/
*.TDS.*/Release/
*.TDS.*/PROD-*/
*.TDS.*/Sandbox/
*.TDS.*/IconCache/
/sandbox/
*.user
**/bin
**/obj
*.suo
That’s all for now – hopefully I’ll have some time to finish this series with how to setup dev workstations. Happy coding, and Tommy – you owe me a lunch.
Great article.
Why not use SlowCheetah to create the config transforms?
For a while I used the option to split the TDS packages into items and files. After a few months I decided to have three TDS projects: Packages.Core, Packages.Master, and Packages.Files. Then in VS I just configure the PROD builds to not build and deploy the Packages.Master project.
Thanks for the comment Michael – just preference really – i guess I am getting old, I just prefer using small, granular patch files for my configs … several here at BrainJocks disagree with me on that one 🙂
Nice post Brian. It’s always interesting to see the different ways people setup their Sitecore environments.
With the last section, to save you from the details, here’s a post about TDS and the .gitignore file.
http://seankearney.com/post/Using-Team-Development-for-Sitecore-with-GitHub
Pingback: Clean up after TDS File Replacement | Jocks to the Core
Pingback: Bug Fix: TDS build not pushing from Visual Studio Project to Sitecore Install - bv02
How would you handle items that need to be added to the main web.config (and are not Sitecore)? For example if I wanted to add a custom log4net logger I believe that is outside of the Sitecore configuration in web.config. So I can’t use the include files.
We normally document these things in an Environment Set Up guide and do manually on a target Sitecore instance (including local). There’s only a few places in the Web.config that you would need to touch outside of sitecore section and I don’t believe having to do so warrants bringing in the whole Web.config under source control. And so we don’t.
Hi Pavel,
Great article very helpful. I find when I remove the web.config this causes the intellisense in my layout files to break as it no longer understands the tag prefixes. Is there a work around for this?
Thanks
Can the Web.config that’s under your Views (YourSolution.Web/Areas/YourArea/Views/Web.config) help you with that? We keep that one in the solution and the source control.
Amazing post, I have also made my contribution to this theme with good details about setting up environments for a Sitecore team development.
http://blog.peplau.com.br/en_US/sitecore-environments-for-dev-qa-uat-and-production/
This is great! Do you have a strategy for auto updating javascript/css/views on save rather than relying on TDS to copy them on build?
You will find a few ideas in this twitter conversation: https://twitter.com/techphoria414/status/573287189276057600
I keep getting an error when I try to compile the solution
Could not copy the file “C:\…\Solution Folder\OD.Web\Web.config” because it was not found.
However this tutorial says to delete the Web.config file from within the Project.Web folder.
Hey Mike, you probably want to make sure you also removed the file from your solution. Your Visual Studio still “sees” but the file is no longer on the file system. TDS will try to copy it (it also “sees” it because it’s still referenced in your *.csproj) and that’s the error you are seeing.
> You are correct my friend. Kudos!