Enabling HTTPS is a common task when developing HTTP based applications. With many platforms, such as Apache server, WebLogic, JBoss etc, it’s simply a matter of clicking a checkbox, or change one config line. For a Mule application, it takes a bit more finessing.
There are plenty of posts and online resources discussing it. Yet I still find many beginners are confused or surprised by the steps involved. Here is my end-to-end instructions I commonly share with new developers on the projects.
Assume you created your own hello-world Mule application that runs on port ${http.port}, assume that’s port 8081, sample source code like below:
<http:listener-config name=”HTTP_Listener_Configuration” host=”0.0.0.0″ port=”${http.port}” doc:name=”HTTP Listener Configuration”>
</http:listener-config>
<flow name=”https-testFlow”>
<http:listener config-ref=”HTTP_Listener_Configuration” path=”/hello” doc:name=”HTTP”/>
<set-payload value=”hello world” doc:name=”Set Payload”/>
</flow>
First of all, I strongly recommend use ${http.port} and ${https.port} properties to define the regular port and SSL port for your application. These two properties have to be spelled that way. In the future, if you run your application in Cloudhub, those two property names actually matter.
By default, http.port = 8081, https.port = 8082, Cloudhub forwards port 80 to http.port (8081), 443 to port https.port (8082) to your worker VM which runs your application.
Step 1. In order to configure HTTPS, you need to create and import your own cert first.
This is the part new developers find most confusing. As you will see later, if you deploy the app to Cloudhub, your cert is not even used. It’s just a place holder so your project can compile locally. Yet you have to go through the trouble creating and importing it!
Here is the keytool command to create a self-signed cert:
keytool -genkeypair -keystore keystore.jks -dname “CN=localhost, OU=Unknown, O=Unknown, L=Unknown, ST=Unknown, C=Unknown” -keypass password -storepass password -keyalg RSA -sigalg SHA1withRSA -keysize 1024 -alias mule -ext SAN=DNS:localhost,IP:127.0.0.1 -validity 9999
The result keystore.jks file is your certificate. Put it under src/main/resources directory
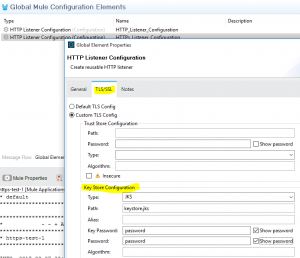
Step 2. configure your HTTPS and TLS , now your code looks like this:
<http:listener-config name=”HTTP_Listener_Configuration” host=”0.0.0.0″ port=”${http.port}” doc:name=”HTTP Listener Configuration”>
</http:listener-config>
<http:listener-config name=”HTTPs_Listener_Configuration” protocol=”HTTPS” host=”0.0.0.0″ port=”${https.port}” doc:name=”HTTP Listener Configuration”>
<tls:context>
<tls:key-store type=”jks” path=”keystore.jks” keyPassword=”password” password=”password”/>
</tls:context>
</http:listener-config>
<flow name=”https-testFlow”>
<http:listener config-ref=”HTTPs_Listener_Configuration” path=”/hello” doc:name=”HTTP”/>
<set-payload value=”hello world” doc:name=”Set Payload”/>
</flow>
Step 3. Test it
Test run locally: https://localhost:8082/hello
Please note your certificate is not trusted, your browser will complain, so click on accept/proceed or whatever to pass the warning screen.
Test it on Cloudhub – once your project is deployed to cloubhub, your certificate will be replaced by Cloudhub, your project will run on port 443, it would be something like HTTPS://my-hello-https-test.cloudhub.io
That’s all, folks!


