
Overview
Monitoring profile helps you to customize the events emitted by message flow’s node level at run time. Transaction and terminal events are the two major types of events emitted by the message flow. Transaction events are emitted only from input nodes E.g., MQInput and FileInput. Terminal events are emitted from terminals of any nodes.
Monitoring event defined as monitoringprofile.xml file. Each event contains the information such as Time stamp, message flow details, event name, unique id and the data processed by the message flow.
IBM Integration Bus uses publish/subscription concept to manage the monitoring. Events are published to special topic called “$SYS/Broker/IntegrationNode/Monitoring/IntegrationServer/#” and the interested applications subscribes to the topic. The Emitted events footprints are stored in database. It can be read and consumed by IBM WebSphere Integration web console to track and report message flow transaction-level performance data, support transaction monitoring and auditing.
This use-case describes how to configure the Integration server, Database and IBM Integration Web UI to log the foot prints of events emitted by message flow.
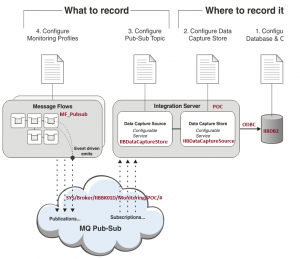
Below are key configurations described in this blog to enable monitoring for a message flow,
- Database Configuration
- ODBC Data source Configuration
- ODBC configuration for Integration Node
- IBM Integration Web UI Configuration
- System Queue Creation
- Message Flow development
- Monitoring Profile Creation and activation
- Verifying the monitoring Logs
Database Configuration
Below steps describes the database configuration and Creation of required tables to store the events emitted by message flows.
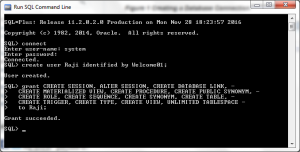
- Open SQL command line console
- Connect as the SYSTEM user (Type: connect, Enter user-name: system and Enter password: <password>)
- Create the user as per the syntax “create user Raji identified by Welcome01;“
- Grant the user with the necessary privileges “grant CREATE SESSION, ALTER SESSION, CREATE DATABASE LINK, – CREATE MATERIALIZED VIEW, CREATE PROCEDURE, CREATE PUBLIC SYNONYM, – CREATE ROLE, CREATE SEQUENCE, CREATE SYNONYM, CREATE TABLE, – CREATE TRIGGER, CREATE TYPE, CREATE VIEW, UNLIMITED TABLESPACE – to Raji;”
Use SQL Developer to create DB for the newly created user
Step 5: Right click New Connection

Step 6: Enter connection details -> ConnectionName, UserName, Password, HostName, Port and SID
Step 7: Click Test button (if the status is success) -> then click connect button

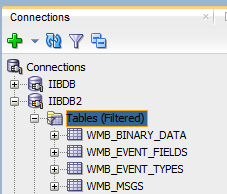
Step 8: Copy and paste the queries from location C:\Program Files\IBM\IIB\10.0.0.4\server\ddl\oracle\DataCatureSchema.sql (IBM installable location) to SQL work sheet to create required tables to store the events.

Step 9: Run the copied script to create tables. Below four tables should be created after executing the script.
ODBC Data source Configuration
Create data source name under System DSN to connect DB.
Step 1: Go to Start -> Control Panel -> Administrative Tools -> Click Data Sources (ODBC)
Step 2: Select General tab ->Click Add button ->Enter Data Source Name, host, port number and serviceName

Step 3: Select Advance tab, Enter Extended Options as WorkArounds=536870912;, Query Timeout as 0 and select the check box Enable SQLDescribeParam.
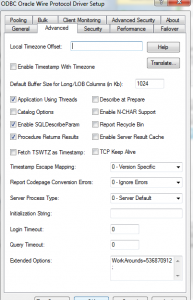
Step 4: Click Test button -> Enter user name, Password and click ok.

Step 5: Click Apply and ok.
ODBC configuration for Integration Node
Execute below commands in IBM Integration console to configure ODBC connection.
Step 1: mqsisetdbparms command used to store the database credentials in Integration server, mqsisetdbparms IIBBK01D -n IIBDB2 -u Raji -p Welcome01
Step 2: Run mqsicvp command to verify that the database connection, mqsicvp IIBBK01D -n IIBDB2
Step 3: To ensure that the changes take effect, restart the Integration Node, mqsistop IIBBK01D and mqsistart IIBBK01D

IBM Integration Web UI Configuration
Below steps defines the configuration of port number, Datacapture store and Datacapture source for Web UI.
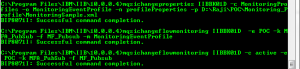
Step 1: To set the HTTP port using the mqsichangeproperties command in the command console, mqsichangeproperties IIBBK01D -b webadmin -o HTTPConnector -n port -v 4416
Step 2: To confirm properties changes, run the mqsireportproperties command, mqsireportproperties IIBBK01D -b webadmin -o HTTPConnector –a
Step 3: To ensure that the changes take effect, restart the Integration node, mqsistop IIBBK01D and mqsistart IIBBK01D
 Step 4: Open Web browser and type http://localhost:4416/ . IBM Web console UI will be opened as per below image.
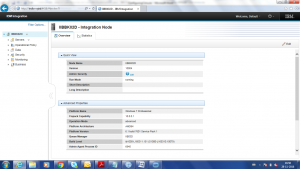
Step 5: Expand IIBBK01D -> Expand Operational Policy -> Select Configurable Services -> Click Create.

Step 6: Create the Data Capture store in Web UI as per the below image,

Alternatively run the below command in command line console to create the data capture store, mqsicreateconfigurableservice IIBBK01D -c DataCaptureStore -o IIBDataCaptureStore -n dataSourceName,egForRecord ,egForView -v IIBDB2,POC,POC
Step 7: Again Select Configurable Services-> Click Create to create the Data Capture source.

Step 8: Create the Data Capture source in Web UI as per the below image,

Alternatively run the below command in command line console to create the data capture source, mqsicreateconfigurableservice IIBBK01D -c DataCaptureSource -o IIBDataCaptureSource -n topic,dataCaptureStore -v “$SYS/Broker/IIBBK01D/Monitoring/POC/#”,”IIBDataCaptureStore”
System Queue Creation
Create system queues to receive the event emitted by the flow.
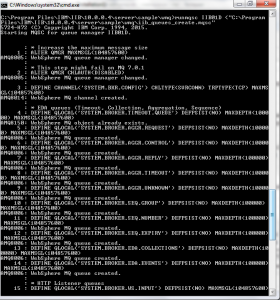
Step 1: Run the System Queues script from the installable location C:\Program Files\IBM\IIB\10.0.0.4\server\sample\wmq\ iib_queues_create.mqsc using below command in command console,
runmqsc IIBBK01D <” C:\Program Files\IBM\IIB\10.0.0.4\server\sample\wmq\ iib_queues_create.mqsc”
Create Message Flow to configure Monitoring Profile
Step 1: Create new Application in IIB as MFA_PubSub
Step 2: Create new Message flow as MF_Pubsub.msgflow
Step 3: Create the processing steps as per below image,

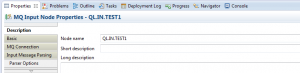
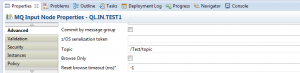
Step 4: Select the input node and configure the below specified properties,


Step 5: Select the compute node and configure the below specified properties,

Step 6: Double click the compute node and write the below code,
Note: No properties for publication node. Create required queues, topic, Subscription and publication in IBM WebSphere MQ.
Step 7: Create bar file and deploy to POC Integration Server

Monitoring Profile Creation and activation
Monitoring profile configurable service used to customize events after a message flow has been deployed without redeploying the flow.
Each event emitted by flow always contains the following information:
- eventSourceAddress – Source of the event
- eventName – Name of the event
- Creation time – Event created time sheet
- localTransactionId, parentTransactionId and globalTransactionId – Correlation ID for events emitted by the unit of work
- messageFlowData
Optionally, monitoring event can also contain the following information:
- applicationData
- specific part or all of the message in bit stream
Sample Monitoring Profile:

Step 1: Create a monitoring profile under location “D:\Raji\POC\Monitoring_Profile\”to customize the event emitted by the message flow as per below attached MonitoringSample.doc file and save the extension as .xml,
MonitoringSample
Step 2: Run the below command in command console to create the Monitoring configurable service, mqsicreateconfigurableservice IIBBK01D -c MonitoringProfiles -o MonitoringEventProfile
Step 3: Run the below command in command console to associate your monitoring profile with the configurable service, mqsichangeproperties IIBBK01D -c MonitoringProfiles -o MonitoringEventProfile -n profileProperties -p D:\Raji\POC\Monitoring_Profile\MonitoringSample.xml
Step 4: Run the below command in command console to associate your monitoring profile and configurable service to the Integration server, mqsichangeflowmonitoring IIBBK01D -e POC -k MFA_PubSub -f MF_Pubsub -m MonitoringEventProfile
Step 5: Run the below command in command console to activate the monitoring profile for MF_Pubsub message flow, mqsichangeflowmonitoring IIBBK01D -c active -e POC -k MFA_PubSub -f MF_Pubsub
Step 6: To ensure that the changes take effect, restart the Integration Node, mqsistop IIBBK01D and mqsistart IIBBK01D

Verifying the monitoring Logs
Step 1: Post the below input message from the Queue,
<emp:Emp xmlns:emp=”http://localhost/employeeDeatils/1.0″>
<Header>
<MessageName>EmpData</MessageName>
<MessageID>MSGID0978</MessageID>
</Header>
<Details>
<EMPID>23</EMPID>
<EMPNAME>Shivathmica</EMPNAME>
</Details>
</emp:Emp>

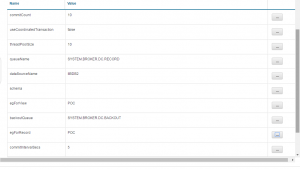
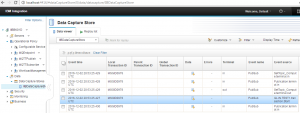
Step 2: Below snapshot is the Emitted events footprints in data base,

Step 3: Below snapshot specifies foot prints of events emitted by message flow in Integration Web UI,
Conclusion
This blog has shown you how to configure the Integration server to record and view the foot prints of events emitted by the Message flow using monitoring profile.
It is very good articles, we able to see how to do event monitoring by example. but only one thing images are not able to see properly. Thanks for sharing
IBM Integration Bus Online Training
Images are not visible properly
Using Monitoring in a production environment, could affect performance on the machine? How critical could be it?
@ Danny – It’s depends on the number of events you have enabled on the flow. Minimal number of event emission won’t affect the performance in prod.
Hi kindly guide me i have to create an monitoring through message flow to monitor constantly in IIB when its database connection goes down or its SFTP connection goes down.