![]() With an Oracle Business Intelligence Cloud Service (BICS) subscription, you get accesses to two instances: Test and Production. The test instance can be the initial playground where the upfront development work is carried out before pushing the developed components to the Production instance. The development work may entail creating tables in the Oracle Cloud Schema Database, loading data, creating data models, reports and dashboards. You may very well find yourself with a fully functional system on the Test instance and now thinking of how to migrate everything to Production. This blog elaborates on how to achieve such a task.
With an Oracle Business Intelligence Cloud Service (BICS) subscription, you get accesses to two instances: Test and Production. The test instance can be the initial playground where the upfront development work is carried out before pushing the developed components to the Production instance. The development work may entail creating tables in the Oracle Cloud Schema Database, loading data, creating data models, reports and dashboards. You may very well find yourself with a fully functional system on the Test instance and now thinking of how to migrate everything to Production. This blog elaborates on how to achieve such a task.
The BICS migration process consists of 2 parts:
- Database Tables and Data: This is the more challenging part of the migration process. At the time of writing this blog, BICS is only supported with the Oracle Database Cloud Schema Service – a limited version of the Oracle database that doesn’t support full access to the Cloud Database as with the case of the Oracle Database Cloud Service. The Oracle Database Cloud Service provides a lot more flexibility on how to migrate database structures and data since such a cloud database can be treated just as an on-premise database. However, the Schema Service is restricted in what you can do when connecting to it from a database client like SQL Developer. Consequently, I explain through this blog how to migrate database components and data from one Oracle Cloud Schema Service (BICS Test) to another Oracle Cloud Schema Service (BICS Prod).
- BI Components: This consists of the data model (facts, dimensions, and joins – if you know OBIEE this means everything related to the RPD file) and front-end components such as reports, prompts, and dashboards (in other words, the OBIEE catalog). Oracle provides a convenient method of migrating everything I mentioned here using the BICS Snapshotting feature. Taking a snapshot from BICS Test and restoring it on the BICS Production instance is very straightforward. If it weren’t for the first part above, I really wouldn’t have thought of writing this blog as the snapshotting capability is very well presented by Oracle and you can reference it via this link: https://www.youtube.com/embed/otHxhdqrlHE
Migrating Database Tables and Data
If you are dealing with only a few tables on the Test instance, you may want to get the DDL scripts of those tables (you can do that by connecting to the BICS Test Schema database from SQL Developer) and apply them to the BICS Prod instance by using the Prod Schema Service’s SQL Workshop. This entails generating the DDL script for each individual table separately and then exporting and importing the corresponding data files for each table individually using the Data Workshop of each instance.
The above approach will be time-consuming if you have several tables and a large data volume. Alternatively, you can follow a more streamlined approach to extract the data structures and corresponding data. With the Oracle Cloud Database Schema Service, you won’t be able to migrate directly from Test to Prod. You will need to follow a 3 stage approach:
- Extract from the Test instance to a dump file (.dmp)
- Import the dump file into a local/on-premise database: In my example below I used Oracle Database Express which is a free version of the Oracle Database, but you may use an Oracle Database Standard or Enterprise Edition as your local/on-premise database for this stage. I have also used SQL Developer (a free tool from Oracle) as a client to connect to Oracle Database Express and to do the dump file import.
- Deploy the tables/data from the local database to the BICS Production instance.
Here are detailed steps to achieve this migration
- Export data from the BICS Oracle Database Cloud Service in the Test instance:
Login to your Oracle Cloud Account and navigate to the Oracle Database Cloud Schema Service associated with your BICS instance. Once you land on a page similar to the following, select Exports from the left side and then click on the “Export Data” button.

Next you will be asked to specify whether you want to export only the data structure or include data as well. I selcted to include data. This exports all database objects and data into a single dump file (.dmp).

You will then see an export item under Exports with a Status of Requested. Wait a few minutes and refresh this page. You will notice the Status change to “Available”. The next step is to download the dump file using ftp. Take note of the SFTP host, port and user as highlighted in the screenshot below.


The Future of Big Data
With some guidance, you can craft a data platform that is right for your organization’s needs and gets the most return from your data capital.
If you don’t know the sftp user password, you can reset it by clicking on Users on the top right side and then select the “SFTP Users” tab. Find the user that was previously highlighted and do a “Reset Password”. (Take note of the new password so you can use it in the ftp connection next.)

You will then need to connect via an ftp tool. I used FileZilla (a free tool that you can download). Enter the connection details using the host, port, user and password that were noted from the Oracle Database Cloud Service. Navigate to the “downloads” folder and look for the most recently created dmp file. Download the file to a local machine that has SQL Developer.

2. Create a new user (schema) on your local or on-premise database:
You may omit this step if your local database already has a schema that you can import the dump file into. I wanted to separate this dump file content from everything else I had in my local database and therefore chose to create a new schema dedicated for my BICS data dump. To do that in SQL Developer, expand the local database connection, right click on Other Users and select Create New User.
3. Import the dump file generate in the first step into the local database:
SQL Developer makes it easy to import the dmp file into your local database. First make sure that the dmp file is located on the local database server. For example, for myself I placed it under:
C:\oraclexe\app\oracle\admin\XE\dpdump
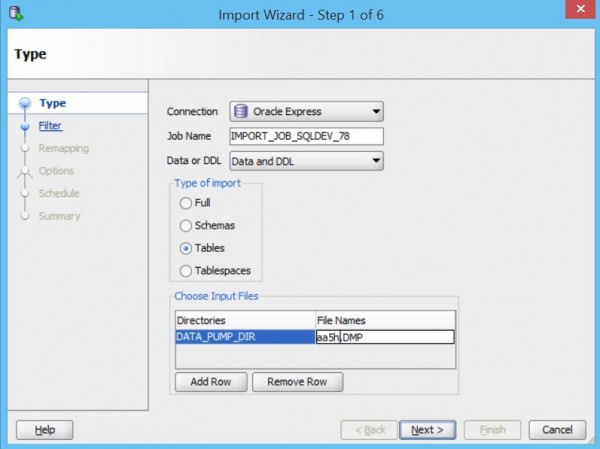
In SQL Developer, select DBA from the View menu. This displays the DBA window as in the following screenshot. Right click on “Data Pump” and select “Data Pump Import Wizard…”.

The data pumpt wizard gives you the option of whether to import tables only or the full schema and other options. I found it best to import the schema as this gives me the option of selecting database views as well that I can include in the migration. The DATA_PUMP_DIR should be the same location where your dmp file is placed so SQL Developer can find it. Enter the name of the dump file next to DATA_PUMP_DIR.
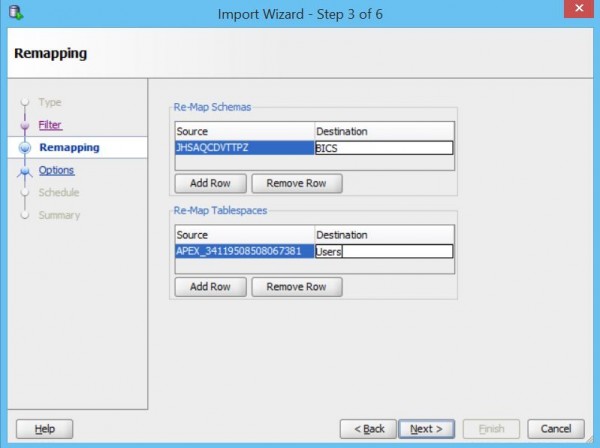
Follow the screens of the wizard. On one of the screens you need to map the source schema and tablespace to a target schema and tablespace in your local database. In the following screenshots, notice I mapped my Oracle Cloud Database Service schema to my local BICS schema that I created in Step 2. I have also mapped the cloud tablespace to the local Users tablespace.
Complete the wizard and once its done you can connect to the local database with a user that has access to the imported schema (for me that is the BICS user). Confirm that you see the objects that you expected to be imported.
You can also take a look at the import log file on the local database server to see if there were any errors. This is usually the same location referenced above where you place the dmp file. For my case my log file is located at: C:\oraclexe\app\oracle\admin\XE\dpdump\IMPORT.LOG

4. Deploy database objects and data from the local database to the BICS Prod instance:
This process is very well documented by Oracle and you can reference the following link to migrate tables/views/data from your local/on-premise Oracle Database to the BICS Prod instance leveraging the “cart” feature of SQL Developer.