
Sitecore’s XM Cloud CMS is the future of enterprise content management offerings from Sitecore, and a viable option today. With new tooling including: “Sites”, “Pages” and “Components” it offers a better content author experiences that is not available in its other CMS offerings. With built in analytics, personalization that works at the edge, you are getting the fastest and most flexible platform available today. And because it’s fully SaaS and cloud native, you’ll get more capabilities over time without ever needing to upgrade.
Existing Sitecore Customers who want to adopt XM cloud may feel overwhelmed at figuring out where to start. If you’re building a new site from scratch or have plans to redesign and reimplement a site, starting a greenfield implementation is relatively straight forward. But if you have significant investment in XP, MVC and ASP.Net, you may not have the appetite or budget to rebuild everything from scratch, at least all at once.
To get there gradually, you’ll need careful planning and execution. Most important of all, you’ll need a road map. Here’s how I recommend going about putting a road map together.
Step 1: Upgrade if necessary
To get to XM Cloud, your solution will need to be implemented using Sitecore Headless Services. While there are older versions of JSS that support Sitecore 9, to start from a strong foundation and leverage Next.js, you’ll need to upgrade to at least 10.1. If you are going to upgrade, I’d recommend targeting the latest version of Sitecore. 10.3 should be released soon.
An upgrade can be a project in itself, particularly if you’re in an older version. You’ll need to consider use of WFFM forms, the introduction of Identity Server and Depreciation of the AD Module, Compatibility issues with other modules and dependencies like Glass Mapper, Depreciation of Azure Search, Migration of xDB data and more.
You can also consider whether to downgrade from XP to XM as part of the upgrade. To properly move to XM Cloud, you’ll need to remove all dependencies on xDB and XP’s marketing features. If you’re not using them anyway it’s an easy decision. If you are using it minimally, you can remove them as part of the upgrade. If it’s too complex, you can upgrade to XP, and remove the dependencies during feature migration.
If you have a large or complex solution, upgrading is the way to go. If you have a smaller solution, you could consider setting up a new instance of Sitecore to host the migrated headless features. In order to support that you’ll need to deal with additional hosting and support costs for dual environments not to mention making sure your Sitecore license can support that approach. Dual environments only make sense if you can constrain the migration to headless to a fixed, shortened timeline.
Step 2: Set Your Headless Foundation
Once you have an environment that supports Sitecore headless services, you need to establish a headless foundation to support migrating features to the new architecture. Getting there requires making a number of decisions and some setup and configuration work.
Select a Framework
Sitecore Headless services supports several front-end frameworks including React, Angular, Vue, .Net Core and Next.js. Unless you have a strong affinity for any of the former frameworks, my recommendation would be to use Next.js for its runtime static generation capabilities which will help improve performance of the underlying solution. There is also less boilerplate code. Sitecore is also investing more in this framework, building support for Headless SXA into it. I would also suggest leveraging the headless SXA features for its automation, page design and component variant support.
Select a Rendering Host
Your front-end application needs to be hosted somewhere. Since the only requirement is the support of Node.js, there are a ton of options. If you want high performance, you want a serverless hosting platform that supports edge functions and static generation. Vercel and Netlify are popular options and Sitecore’s partnership with Vercel and ownership of Next.js make it a very compelling option. You can try to self-host to save cost, but account for the additional dev ops, maintenance, and operational cost if you go that route. A compromise could be to self-host for lower environments.
Choose a Delivery Strategy
After installing Sitecore headless services you will have access to Sitecore’s layout service and graphQL API. By default, your front-end application will get content and layout details using these services that are hosted on your CD servers. An alternative approach would be to use Sitecore’s Experience Edge. This service allows you to publish your content and layout details to the edge, making them globally available and performant. This option requires additional subscription costs, but eliminates all dependencies on CD servers, allowing you to better scale your infrastructure. It also requires you to think through the architectural implications of not having CD servers. This is also required for moving to XM cloud, so doing it now will make it that much easier to move to XM cloud later.
Configure a Reverse Proxy
If you’re not planning on rebuilding entire sites in one step, leveraging a reverse proxy like Azure Front Door will enable to direct traffic between your existing MVC site and new rebuilt headless features based on url patterns.
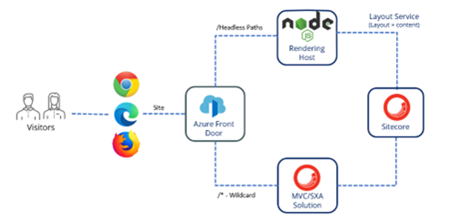
Including this as part of your headless foundation will allow you to migrate features incrementally without having to deal with redirects that could impact SEO.
Create Dev Ops Processes
With a rendering host selected and a reverse proxy configured, the only thing left is to get your dev ops processes to fully automate deployments. Having a separate front-end application provides some additional flexibility and considerations that you didn’t have with a purely MVC based site.
Now you can separate out deployments of your backend Sitecore code and templates from your front-end application. This will allow you to deploy new versions of the application without needing to redeploy Sitecore and wait for CM and CD servers to recycle. You’ll also need to think through how to handle coordinating deployments across both when you need to update both to ensure nothing breaks.

Step 3: Create a Prioritized Backlog
With a solid headless foundation, you need to put together a prioritized backlog of features to migrate to headless. When putting your plan together consider the following.
Features that are highly visible and impactful
It’s important when taking on a project that will gradually migrate features to headless that stakeholders see the value of it so that they continue to fund it. Choosing highly visible pages and features that you can move to a headless architecture, enhancing functionality and improving performance will give you the organizational goodwill to stay the course.
Features that other features are dependent on
It’s important to understand dependencies between features and how moving one feature may impact others so that you can prioritize accordingly. A perfect example of a highly dependent feature is Site Search. If you are migrating content from your MVC site to your headless site in the content tree, you will need to account for having a search feature that will return results from both the migrated and non-migrated content trees. Prioritizing site search so that you can enhance it to support unified search results is a typical early feature.
Features that have planned enhancements
If there are already backlog items on a feature for enhancements, prioritizing those features for a headless rebuild will save you from having to implement that enhancement twice. It also shows responsiveness to your business stakeholders and helps with building organizational goodwill.
Features that would benefit from a performance boost
A great way to demonstrate the benefits of your headless architecture is to prioritize rebuilding poorly performing areas of the site. Collect performance metrics of the MVC version of the feature and then for the headless version. Take lighthouse scores of the before and after as well. Use this data to promote the migration effort.
Additional Architecture Considerations
As you prioritize your migration roadmap, there are several architectural considerations you should take into account. These include:
- Content Reuse and Management – Dependencies also involve content. If you migrate a feature that other non-migrated pages refer to for content, you’ll need to think through how it will be managed and make sure content authors understand the impacts or limitations.
- Global Component Library – As you build out your new headless templates and components, maintaining a global component library to ensure they are properly documented is a key to long term governance of the solution. Creating a Pattern Library site to document available components or leveraging tools like storybook help avoid component sprawl and maintenance issues.
- Controller & API usage – As you move MVC features over to headless and Next.js, it’s important to keep in mind that if your ultimate goal is XM cloud, there are no CD servers where you can host custom API endpoints available to you. While you could get by with such approaches with a hosted XM solution, you’ll need to remediate it when you move to XM cloud.
- Removing Dependencies on xDB – If you still have XP, as you migrate features, you should think through how to remove any dependencies on xDB and anything else that will not be available to you in XM Cloud.
- Adding Composable Features – It’s important to consider whether it makes sense to introduce composable features as part of the migration. Adding personalization and testing with Sitecore CDP and Personalize may demonstrate more value than migrating some of the lower value content pages. You don’t need to wait till the end to introduce these capabilities.
- Search – Search is a composable feature worth discussing on its own. XM cloud has no web database or indexes. This means any code that leverages the content search API will need to be rewritten. Composable solutions like Sitecore Search, Coveo Cloud and even Search Staxx Studio provide easy to integrate search solutions. Otherwise, you’ll need a custom solution that handles not only the search results but indexing as well.
Step 4: Migrate Features
Once your headless foundation is set and your backlog is ready, it’s time to start migrating features. Establish a sprint and release cadence to make sure you make consistent progress. Consider creating a communication plan to make sure your stakeholders are kept apprised of the progress being made and the performance and lighthouse score improvements as features are migrated.
With every release you will move more and more traffic from your MVC application to your headless rendering host so be sure to evaluate the performance and load on your servers. You may be able to reduce the number or sizing of the servers as the load decreases to your CD servers.
Lastly, keep track of how many features are left to go. As you complete the migration to headless you should start planning the move to XM Cloud including procuring needed licenses.
Step 5: Move to XM Cloud
Once all your features have been migrated to a headless architecture you may be ready to migrate to XM cloud. It’s important to evaluate the features of XM cloud to make sure it has all the capabilities you require. Once you’re ready, you’ll need to account for the following:
Account for any rework to deal with technical debt
If you architected your features properly when moving to headless, the migration effort will be minimal. Remember XM cloud has no CD servers, so any code that relied in a CD server to handle a request will need to be reworked. See the earlier section on architectural considerations and make sure you’re ready to migrate or account for any additional needed refactoring as part of your migration plan.
Provision & Configure XM Cloud
Once you have a license for XM cloud and access to the cloud portal you’ll be able to provision projects and environments. Think through your development processes and create the environments to support your quality assurance requirements.
Also consider how you will manage access to your new XM cloud environment. XM cloud uses a new Cloud portal where an administrator can issue invites and provision access.
Update Dev Ops Processes & Deploy Templates & Code
XM Cloud currently integrates with Vercel and Github with other providers planned in their roadmap. You’ll need to evaluate the built-in capabilities vs. managing your build and release pipelines in an external tool like Azure dev ops.
Given that your headless solution is probably already managed with an external tool, making modifications to target XM cloud instead of your CM server may be the most straight forward approach, but take into consideration that XM cloud can allow for deployments to be initiated in the Cloud Portal. Whether you want to support that for your solution and your user base is another question.
Once your dev ops processes are updated, the best way to test them will be to deploy them to your newly created XM cloud environments. You will also need to update your front-end application to talk to XM Cloud’s Experience Edge endpoints.
Migrate Content & Cut Over
With the solution ready to go, all that’s left is to migrate your content and cut over. Migrating content can be as simple as packaging everything from your old instance and installing it on your XM cloud instance. You can also look at tools like RAZL, thought they may require some deployment and configuration to work on your XM Cloud instance.
Once the content is there and all your testing is complete, cutting over should be as simple as updating your reverse proxy to point to your new front-end application.
Plan and Execute Training
While XM Cloud supports experience editor, it is important to think through enablement of XM cloud’s other features. Sitecore Pages provides an enhanced editing experience. There are new analytics and personalization capabilities that have new interfaces that content authors and marketers will need to learn and master.
Wrapping Up
Going through this process is not a short-term endeavor but shows you how you can mitigate risks while adding value through out a migration process that sets you up for success in the long run on a modern enterprise platform that will probably have a lot more capabilities that it did when you started this process.
Once you’re on XM Cloud, don’t forget to update your roadmap to leverage some of the XM Cloud only features. Get started with edge personalization and Sitecore components to provide tangible value that will demonstrate the success of the migration.
Do you need help with your XM Cloud roadmap? We’d love to help. Reach out to me on LinkedIn , Twitter or fill out our contact form.